Probably a global lockdown is a good time to resume a series that demands a lot of your time. Not really if your kids are home too. But I’ve been getting enough reminders through comments and emails that I thought it’s time to tackle this challenging episode.
Yes, this is an episode with a lot of Physics and Mathematics. But you will observe it has a very gentle learning curve since there is enough background presented in the problem requirements and in previous episodes. The real challenge is in translating the math to code.
Computers are computing devices crunching numbers all the time. So you might think implementing math formulas should be straightforward. Unless you are a scientist or a mathematician, in which case, you would know the truth which is – it is not straightforward at all.
I remember before Doom came out, it was very hard to develop a 3D engine. Most of the available research involved understanding computer graphics text books with a lot of math theory. It’s a painful task to translate formulas into algorithms and later performant code. There are many ways you could get it wrong. But only one way to get it right. Even more frustrating is forgetting to account for edge conditions like a negative result or divide by zero and floating point errors.
I remember referring one of the most popular books at that time Numerical Recipes in C++ to understand how to implement some of the algorithms. But I had to abandon the project after a working prototype because making a game engine (alone) is a tonne of work!
In this part, I have used a lot of images and slides to make sure that I don’t skip any explanations (like how cosine and dot products are related). I know that these videos are being watched by all kinds people – students, experienced programmers and non-programmers. So I have not made any assumptions.
Hopefully you would enjoy this part without any challenges. Even if you do, it should be fun 😊
These are the topics we will cover in this episode:
Books and articles that can help understand this part:
Game Engine Architecture Great introduction to graphics concepts and techniques used in computer games. It might be different from raytracing since focus is on realtime rendering rather than realism.
Argparse Tutorialargparse is the new standard for Python argument parsing.
In Dec 2019, we saw the release of Django 3.0 with an interesting new feature — support for ASGI servers. I was intrigued by what this meant. When I checked the performance benchmarks of asynchronous Python web frameworks they were ridiculously faster than their synchronous counterparts often by a factor of 3x–5x.
So I set out to test Django 3.0 performance with a very simple Docker setup. The results — though not spectacular — were still impressive. But before that, you might need a little bit of background about ASGI.
Before ASGI there was WSGI
It was 2003 and various Python web frameworks like Zope, Quixote used to ship with their own web servers or had their own home grown interfaces to talk to popular web servers like Apache.
Being a Python web developer meant a devout commitment to learning an entire stack but relearning everything if you needed another framework. As you can imagine this led to fragmentation. A PEP 333 - “Python Web Server Gateway Interface v1.0” tried to solve this problem by defining a simple standard interface called WSGI (Web Server Gateway Interface). Its brilliance was in its simplicity.
In fact the entire WSGI specification can be simplified (conveniently leaving out some hairy details) as the server side invoking a callable object (i.e. anything from a Python function to a class with a call method) provided by the framework or the application. If you have a component that can play both roles, then you have created a “middleware” or an intermediate layer in this pipeline. Thus, WSGI components can be easily chained together to handle requests.
When connecting became easy, merriment followed
WSGI became so popular that it was adopted not just by the large web frameworks like Django and Pylons but also by microframeworks like Bottle. Your favourite framework could be plugged into any WSGI-compatible application server and it would work flawlessly. It was so easy and intuitive that there was really no excuse not to use it.
Road ‘Blocks’ to Scale
So if we were perfectly fine with WSGI, why did we have to come up with ASGI? The answer will be quite evident if you have followed the path of a webrequest. Check out my animation of how a webrequest flows into Django. Notice how the framework is waiting after querying the database before sending the response. This is the drawback of synchronous processing.
Frankly this drawback was not obvious or pressing until Node.js came into the scene in 2009. Ryan Dahl, the creator of Node.js, was bothered by the C10K problem i.e. why popular web servers like Apache cannot handle 10,000 or more concurrent connections (given a typical web server hardware it would run out of memory) . He asked “What is the software doing while it queries the database?”.
Looks like she has been waiting forever
The answer was, of course, nothing. It was waiting for the database to respond. Ryan argued that webservers should not be waiting on I/O activities at all. Instead it should switch to serving other requests and get notified when the slow activity is completed. Using this technique, Node.js could serve many orders of magnitude more users using less memory and on a single thread!
It was becoming increasingly clear that asynchronous event-based architectures are the right way to solve many kinds of concurrency problems. Probably that is why Python’s creator Guido himself worked towards a language level support with the Tulip project, which later became the asyncio module. Eventually Python 3.7 added the new keywords async and await to support asynchronous event loops. This has pretty significant consequences in not just how Python code is written but executed as well.
Two Worlds of Python
Though writing asynchronous code in Python might seem as easy as sliding an async keyword in front of a function definition, you have to be very careful not to break an important rule - Do not freely mix synchronous and asynchronous code.
This is because synchronous code can block an event loop in asynchronous code. Such situations can bring your application to a standstill. As Andrew Goodwin writes this splits your code into two worlds - “Synchronous” and “Asynchronous” with different libraries and calling styles.
When two worlds collide, results can be quite unexpected
Coming back to WSGI, this means we cannot simply write an asynchronous callable and plug it in. WSGI was written for a synchronous world. We will need a new mechanism to invoke asynchronous code. But if everyone writes their own mechanisms we would be back to the incompatibility hell we started with. So we need a new standard similar to WSGI for asynchronous code. Hence, ASGI was born.
ASGI had some other goals as well. But before that let’s look at two similar web applications greeting “Hello World” in WSGI and ASGI style.
Notice the change in the arguments passed into the callables. The scope argument is similar to the earlier environ argument. The send argument corresponds to start_response. But the receive argument is new. It allows clients to nonchalantly slip messages to the server in protocols like WebSockets that allow bidirectional communications.
Like WSGI, the ASGI callables can be chained one after the other to handle web requests (as well as other protocol requests). In fact, ASGI is a superset of WSGI and can call WSGI callables. ASGI also has support for long polling, slow streaming and other exciting response types without side-loading resulting in faster responses.
Thus, ASGI introduces new ways to build asynchronous web interfaces and handle bi-directional protocols. Neither the client or server needs to wait for each other to communicate - it can happen any time asynchronously. Existing WSGI-based web frameworks being written in synchronous code would not support this event-driven way of working.
Django Evolves
This also brings us to the crux of the problem with bringing all the async goodness to Django - all of Django was written in synchronous style code. If we need to write any asynchronous code then there needs to be a clone of the entire Django framework written in asynchronous style. In other words, create two worlds of Django.
Well, don’t panic — we might not have to write an entire clone as there are clever ways to reuse bits of code between the two worlds. But as Andrew Godwin who leads Django’s Async Project rightly remarks “it’s one of the biggest overhauls of Django in its history”. An ambitious project involving reimplementation of components like ORM, request handler, Template renderer etc in asynchronous style. This will be done in phases and in several releases. Here is how Andrew envisions it (not to be taken as a committed schedule):
You might be thinking what about the rest of the components like Template rendering, Forms, Cache etc. They may still remain synchronous or an asynchronous implementation be fitted somewhere in the future roadmap. But the above are the key milestones in evolving Django to work in an asynchronous world.
That brings us to the first phase.
Django talks ASGI
In 3.0, Django can work in a “async outside, sync inside” mode. This allows it to talk to all known ASGI servers such as:
Daphne - an ASGI reference server, written in Twisted
Uvicorn - a fast ASGI server based on uvloop and httptools
Hypercorn - an ASGI server based on the sans-io hyper, h11, h2, and wsproto libraries
It is important to reiterate that internally Django is still processing requests synchronously in a threadpool. But the underlying ASGI server would be handling requests asynchronously.
This means your existing Django projects require no changes. Think of this change as merely a new interface by which HTTP requests can enter your Django application.
But this is a significant first step in transforming Django from “outside-in”. You could also start using Django on the ASGI server which is usually faster.
How to use ASGI?
Every Django project (since version 1.4) ships with a wsgi.py file, which is a WSGI handler module. While deploying to production, you will point your WSGI server like gunicorn to this file. For instance, you might have seen this line in your Docker compose file
command: gunicorn mysite.wsgi:application
If you create a new Django project (for e.g. created by running the django-admin startproject command) then you will find a brand new file asgi.py alongside wsgi.py. You will need to point your ASGI server (like daphene) to this ASGI handler file. For example, the above line would be changed to:
command: daphene mysite.asgi:application
Note that this requires the presence of an asgi.py file.
Running Existing Django Projects under ASGI
None of the projects created before Django 3.0 have an asgi.py. So how do you go about creating one? It is quite easy.
Here is a side-by-side comparison (docstrings and comments omitted) of the wsgi.py and asgi.py for a Django project:
If you are squinting too hard to find the differences, let me help you - everywhere ‘wsgi’ is replaced by ‘asgi’. Yes, it is as straightforward as taking your existing wsgi.py and running a string replacement s/wsgi/asgi/g.
Gotchas
You should take care not to call any sync code in the ASGI Handler in your asgi.py. For example, if you make a call to some web API within your ASGI handler for some reason, then it must be an asyncio callable.
ASGI vs WSGI Performance
I did a very simple performance test trying out the Django polls project in ASGI and WSGI configurations. Like all performance tests, you should take my results with liberal doses of salt. My Docker setup includes Nginx and Postgresql. The actual load testing was done using the versatile Locust tool.
The test case was opening a poll form in the Django polls application and submitting a random vote. It makes n requests per second when there are n users. The wait time is between 1 and 2 seconds.
Being fast isn't quite enough, you need to avoid failures
The results shown below indicate around 50% increase in the number of simultaneous users when running in ASGI mode compared to WSGI mode.
Users
100
200
300
400
500
600
700
WSGI Failures
0%
0%
0%
5%
12%
35%
50%
ASGI Failures
0%
0%
0%
0%
0%
15%
20%
As the number of simultaneous request ramp up the WSGI or ASGI handler will not be able to cope up beyond a certain point resulting in errors or failures. The requests per second after the WSGI failures start varies wildly. The ASGI performance is much more stable even after failures.
As the table shows, the number of simultaneous users is around 300 for WSGI and 500 for ASGI on my machine. This is about 66% increase in the number of users the servers can handle without error. Your mileage might vary.
Frequent Questions
I did a talk about ASGI and Django at BangPypers recently and there were a lot of interesting questions the audiences raised (even after the event). So I thought I’ll address them here (in no particular order):
Q. Is Django Async the same as Channels?
Channels was created to support asynchronous protocols like Websockets and long polling HTTP. Django applications still run synchronously. Channels is an official Django project but not part of core Django.
Django Async project will support writing Django applications with asynchronous code in addition to synchronous code. Async is a part of Django core.
Both were led by Andrew Goodwin.
These are independent projects in most cases. You can have a project that uses either or both. For example if you need to support a chat application over web sockets, then you can use Channels without using Django’s ASGI interface. On the other hand if you want to make an async function in a Django view, then you will have to wait for Django’s Async support for views.
Q. Any new dependencies in Django 3.0?
Installing just Django 3.0 will install the following into your environment:
The asgiref library is a new dependency. It contains sync-to-async and async-to-sync function wrappers so that you can call sync code from async and vice versa. It also contains a StatelessServer and a WSGI-to-ASGI adapter.
Q. Will upgrading to Django 3.0 break my project?
Version 3.0 might sound like a big change from its previous version Django 2.2. But that is slightly misleading. Django project does not follow semantic version exactly (where a major version number change may break the API) and the differences are explained in the Release Process page.
You will notice very few serious backward incompatible changes in the Django 3.0 release notes. If your project does not use any of them, then you can upgrade without any modifications.
Then why did the version number jump from 2.2 to 3.0? This is explained in the release cadence section:
Starting with Django 2.0, version numbers will use a loose form of semantic versioning such that each version following an LTS will bump to the next “dot zero” version. For example: 2.0, 2.1, 2.2 (LTS), 3.0, 3.1, 3.2 (LTS), etc.
Since the last release Django 2.2 was long-term support (LTS) release, the following release had to increase the major version number to 3.0. That’s pretty much it!
Q. Can I continue to use WSGI?
Yes. Asynchronous programming could be seen as an entirely optional way to write code in Django. The familiar synchronous way of using Django would continue to work and be supported.
Even if there is a fully asynchronous path through the handler, WSGI compatibility has to also be maintained; in order to do this, the WSGIHandler will coexist alongside a new ASGIHandler, and run the system inside a one-off eventloop - keeping it synchronous externally, and asynchronous internally.
This will allow async views to do multiple asynchronous requests and launch short-lived coroutines even inside of WSGI, if you choose to run that way. If you choose to run under ASGI, however, you will then also get the benefits of requests not blocking each other and using less threads
Q. When can I write async code in Django?
As explained earlier in the Async Project roadmap, it is expected that Django 3.1 will introduce async views which will support writing asynchronous code like:
You are free to mix async and sync views, middleware, and tests as much as you want; Django will ensure that you always end up with the right execution context. Sounds pretty awesome, right?
At the time of writing, this the patch is almost certain to land in 3.1 now, awaiting a final review.
Wrapping Up
We covered a lot of background about what led to Django supporting asynchronous capabilities. We tried to understand ASGI and how it compares to WSGI. We also found some performance improvements in terms of increased number of simultaneous requests in ASGI mode. A number of frequently asked questions related to Django’s support of ASGI were also addressed.
I believe asynchronous support in Django could be a game changer. It will be one of the first large Python web frameworks to evolve into handling asynchronous requests. It is admirable that it is done with a lot of care not to break backward compatibility.
I usually do not make my tech predictions public (frankly many of them have been proven right over the years). So here goes my tech prediction — Most Django deployments will use async functionality in five years.
That should be enough motivation to check it out!
Thanks to Andrew Goodwin for his comments on an early draft. All illustrations courtesy of Old Book Illustrations
Graphics is what made Mathematics enjoyable for me. I first heard of trigonometric functions like sine and cosine when I read GW-BASIC manual. Geometry was easy to visualize with the rudimentary graphics of LINE and CIRCLE statements. While I could see many struggle with Mathematics, I always found it interesting.
So my challenge was to make this math-heavy episode interesting so that you see how I see it. I needed to give personalities to Ray and Sphere before I could show their intersection formula. This needed a lot of illustration and animation work. But I believe the end result was worth it.
This time there is a lot of furious typing and less talking because of the number of lines entered in this part. I did not want to fast forward code writing segments because it doesn’t help the learners. In any case, YouTube can speed up videos if you choose to.
These are the topics we will cover in this episode:
It is always a good idea to create a visible output at the start of a long project. If you are making a game, start with showing something moving on the screen. It keeps you motivated and gives you something cool to show your friends as progress. In the second part of our ray tracer tutorial, I will introduce you to PPM a very simple image format that will be used for our renders. You don’t need to install any image libraries and yet PPM files can be read by most image viewers.
The color class is a lot simpler than what I originally designed. Features like gamma correction and linear interpolation seemed like an overkill for a project like this. But I plan to add some convenience constructors later. Hopefully, this will be a good introduction to how colors are manipulated in computer graphics.
These are the topics we will cover in this episode:
I’m really excited to start a new video tutorial series on creating a ray tracer from scratch. This a set of intermediate-level Python tutorials. Recently realtime ray tracing became a hot topic in the gaming community after various Minecraft Ray tracing videos started popping up. Of course, you need a monster of a machine to get decent framerates. However, we will be making an non-realtime ray tracer entirely in Python.
These are the topics we will cover in this episode:
I have been forever interested in Computer Graphics since creating computer games is what really got me interested in programming (or “coding” as it is the fashionable term now). In early days, ray traced images used to blow my mind compared to the blocky graphics that 3D games generated.
But trying to learn the algorithms was frustrating for two reasons - the mathematics seemed too dense and it took a really long time for each render. In 2015, I spent a weekend playing with various algorithms to create a simple ray tracer in Python by heavily leveraging NumPy.
Wrote a toy raytracer over the weekend in Python and NumPy. ~200 lines. Render time about 10 mins. Shiny ✨😆 pic.twitter.com/ar0GDGXCWh
I felt the NumPy parts looked “un-pythonic”, so I reimplemented it without NumPy. It hit a sweet spot between functionality and readability. You needn’t be a math guru to figure out how it worked. I had to share what a learnt not because there was a lack of ray tracing tutorials but I wanted to make an accessible tutorial with gentle learning curve.
However the process of creating video tutorials have changed over the years. Gone are the days of a simple screen recording or screencasts. Now we have to have slick intros, animations and click-baity thumbnails with a face overlay having a shocked expression. But honestly I am in awe of how much time people spend on making each video (it is way, way more than you think) and how frequently they make them (“new video every week”).
The challenge is even harder when you need to break down all that math and physics behind computer graphics into simple concepts in a logical flow. That also takes way more time than you would expect. Sometimes you find that one clear diagram would explain an idea perfectly but nobody has made one so far so you need to draw a fresh one. Or you need to cut down your explanation because listeners are getting lost in the details. Plus your real life slows you down with work deadlines and goof ups like out of focus video recordings. This process of iterating until my script (and code) became streamlined took me months.
My approach has always been about posting higher quality stuff at low frequencies. So I am happy if the end result was worth the wait (and I hope it is). This could be a tutorial that might outlive many of my other videos and that is satisfying in itself. Hope you’ll enjoy this journey with me as much as I did.
The first picture of a black hole is probably one of the most exciting developments in the world of science. The blurry ring of fiery orange might not seem difficult to produce. In fact, it involved years of effort by an international team of scientists, including computer scientists.
Reading the account, I am excited about the role Python played in this endeavour. This is interesting because when we talk about a scientific discovery we usually talk about the people - the scientists who made leaps of intuitions and found correlations that no one else had. But increasingly technology is playing a significant role in discoveries by sifting through enormous amounts of data and extracting valuable insights.
Python’s popularity in the scientific computing would not be a surprise to most Python programmers today. But back in 2009 when I attended the first PyCon India in IISc Bangalore, I was surprised to see talks on experimental Physics and fluid simulations. When I asked Prof Prabhu on why Python is so popular in scientific computing, he said “it is very accessible to us – non-programmers”.
Casually browsing through the software used by the astronomers, you will find mentions of Python libraries like
Numpy, Scipy, Matplotlib, Pandas and Jupyter. Remarkably, entire projects such as eht-python are written only in Python. Python is not just the language of choice, it is the lingua franca of scientific computing.
Yet, if you think about it, there are better programming languages be it in terms of - speed, type safety or brevity. But Python overcomes these limitations and sometimes succeeds due to some pragmatic language design decisions.
Speed Can Be Delegated
Ironically, plain Python code can perform very poorly for computation intensive tasks. But libraries like NumPy are de facto when it comes to any form of number crunching. It provides an N-dimensional array object with several high level operations like cross product or transpose. The C engine of the library accelerates these operations close to raw machine speed.
In the early days of Python, it was expected that performance intensive parts would be written in other languages like C or FORTRAN and a wrapper interface would be used to invoke them. Over time, wealth of libraries like NumPy made it unnecessary to write any custom C code. Why reinvent the wheel when you can just “import” and use it?
Libraries that Play Well
import gravity - Obligatory XKCD 353
Working with third party C libraries is not for the weak hearted. In 2002, when I was adapting the algorithm in a paper for my project on wavelet-based image compression, I learnt this the hard way. We needed to use an existing Fast Fourier transform library written in C.
The library worked when you used it as is. But if you tried to extend a data structure, you might end up with a null pointer exception. Manual memory management by working out all the code paths turned out to be very stressful. The library was well documented but we practically needed to understand every line before tweaking it.
Eventually, we gave up and started implementing most of the project in Python. It was much easier to work with higher level data structures like dictionaries and lists without going through the dance of malloc and free. Even better, the Python code was pretty much a direct translation of the mathematics in the paper to code.
Python libraries tend to compose quite well (while C libraries don’t). This is partly due to its dynamic typing and automatic memory management, but I personally feel it is mainly due to good conventions. Most of the Python idioms are well documented and this leads to minimum surprises. For instance, a deeply nested class hierarchy is frowned upon because “flat is better”.
Interactive Exploration
Research is explorative. We not know what we may find. Even if we do, we cannot wait for ages to find out because we might be chasing a dead end. An interactive interface is a key tool for a researcher or scientist. A Jupyter notebook is close to the ideal with its live code and embedded visualization abilities.
If you need to try a computation with a different set of parameters, you can invoke it and view the results. Even plot it to visualize it better. Then you could take the results and feed it to another computation. This recorded transcript is a valuable data pipeline that can be replayed by a different user for verification or with a different set of observations.
If you think about it, a conversational interface could be more approachable to a non-programmer. Alan Kay was very impressed with an early interactive programming environment called JOSS developed in RAND that appealed to economists. I find it endearing that it replied to any command it did not understand with a “Eh?” or “SORRY”.
Imagine using today’s voice recognition technology to build such a conversational virtual assistant for scientists. Considering much of science (especially physics) involves mathematics – spelling out complex equations can quickly get tedious. Listening to tables of numbers is no fun either. So unless the conversation steps up with an amazing level of artificial intelligence (imagine a reply like “I have run simulations on every known element, and none can serve as a viable replacement for the palladium core.”), we are probably stuck with current interfaces.
Future of Python
Katie Bouman, one of the key contributors, with the amazing amount of data
M87 EHT project involved processing petabytes of information (which is publicly available). They plan to add new telescopes in the future, increasing the volume of data by orders of magnitude. In general, the computational demands of science will keep growing and even enter new domains. The question is - will Python keep up or get replaced?
Python has a strong ecosystem with hundreds of libraries. It will be hard for another language to reproduce that. It is a very easy language to pick up. The readability is so good that Python code is often compared to pseudocode. I believe, it has changed the expectation of how code should look like. Any new language should have equal or better readability to inspire a switch.
While there are several other promising languages like Julia or Rust, I am confident that Python will remain the scientist’s favourite programming language for a long while. Despite its limitations, Python has found a sweet spot between ease and power.
Every year technological progresses keeps accelerating. This can translate into progress for humanity if we can make technology more accessible. We need physicists, mathematicians, biologists, economists, farmers and so on to use cheap computing power to build better things.
Python does play a significant role by making coding less intimidating and more collaborative. That’s why I believe you will see it in bringing more people to computers and being a part of more future breakthroughs.
If you could design a new programming language, what would it be like? A question I had ever since I took the Programming Languages (PL) course in the third year of my Computer Science Engineering way back in 2001. For the first time, I have an answer – Punchscript.
Punchscript is a programming language made up of punch dialogues by the Indian moviestar Rajinikanth. Punch dialogues are more punchlines than dialogues, delivered in Rajini’s inimitable style in the form of an aphorism or a retort.
Rajinikanth in Baashha (1995)
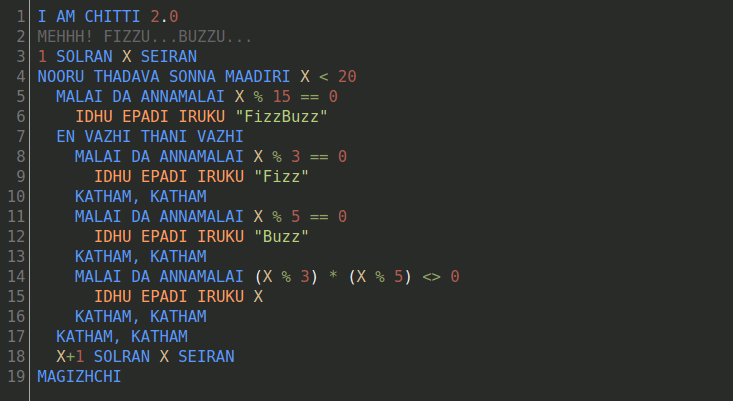
Here is how the customary Fizz Buzz looks like in Punchscript:
Punchscript works with only signed integer datatype. So instead of boolean logic operators, you’ll need to use integer arithmetic logic. Also, it supports only IF… ELSE rather than the IF… ELSEIF… compound statements. Notice how these limitations are worked around in the code above.
You can try Punchscript in your browser and run various examples. Despite its limitations, you can write all kinds of non-trivial algorithms. It is Turing Complete, like most languages. So any computation can be performed it it. But I would not recommend betting your next startup on it.
Chasing the Camel
Remember my PL course of 2001? Among the half a dozen languages we read about, one language stood out as both elegant and practical. That was - ML (ML stood for Meta Language long before some smart guy recently called it Machine Learning). We learnt Standard ML at that time but even then OCaml was much more popular.
Then, year after year, nearly every ICFP functional programming contest had OCaml mentioned by one of the top three winners (the trend changed in recent years). The syntax seemed easy enough and I could pick it up in a few days. After a while, I would completely forget about it, get interested in ML again and have to re-learn the whole thing. I have tracked this sisyphean task of learning OCaml in a decade old journal on Google Docs.
Eventually, I realized I need to do something significant in OCaml. Now which programming problem would be of a moderate size and can be ideally solved in OCaml? The obvious answer was a Compiler (with Ray Tracer being a distant second). The language is excellent at manipulating algebraic data types which is perfect for abstract syntax trees. Even more, the js_to_ocaml tool helps you convert the implementation to Javascript, so that your compiler can run in the browser!
Now comes the question of which language to implement.
Why this Kolavari?
It is way more fun to design your own programming language than to implement an existing one. You start by thinking what new syntax you can come up with.
I thought - syntactic elements should be short and memorable like… punchlines. A bit of a stretch but sounded like a fun project. Rajnikanth movies seemed to be a goldmine of punch dialogues, with most movies having, at least, one.
It took a lot of binge watching research to find the best phrase for a loop or condition statement. I learnt Tamil by the ear so it is not perfect. But I must say that inventing a new language from scratch is both demanding and rewarding.
The hardest part is to select the least amount of syntax while still being useful. It is really tempting to assemble all the favourite features from other languages, but then your project would never get shipped. And as we know, shipping is the most important feature.
The actual implementation took me 4 to 6 weeks (working mostly weekends including combing through user manuals of OCaml tools). Along the way, there were so many decisions to make, like:
Whitespace significance
Data structures
Compiled or Interpreted
Functions or procedures
Virtual Machine or direct AST execution
Funnily enough, I often picked the the third choice of YAGNI. If we can live without a feature, leave it. This not only made the implementation easier but the language more elegant.
There are so many way to set up an OCaml development environment. I’ve setup up all the modern OCaml tools needed in a Docker container. Keeping everything in Docker makes it easier to manage and reproduce.
I started by creating a Docker file based on the opam:alpine_ocaml image. You will need to reproduce the installation commands in the Dockerfile. The only change I made was installing using opam depext instead of opam install, so that external dependencies are installed.
Next, we need to install OCaml’s compiler building tools - OCamlLex and Menhir. There is an excellent chapter on Parsing in the Real World OCaml book which is a good introduction to using these tools. If you are familiar with YACC and LEX from other programming languages like C, it should be like meeting an old friend.
Then I went ahead and installed Emacs as well. This is because Emacs needs to call OCaml for its OCaml mode tuareg to work properly. I found this to be extremely convenient to have a self-contained development environment although Docker purists might prefer it to be separate.
Make sure you are using Dune (previously called JBuilder) for building the project. You will probably still need a Makefile. Most of Punchscript is organized in a library, which can be built into bytecode or Javascript targets.
Read Issu’s recent post on OCaml Best Practices, if you are interested in an overview of modern OCaml development tools.
Learning the Mystical Arts
Setting up everything right might take a while, but that’s only the beginning. There is a ton of resources to writing a compiler or learning OCaml. But hardly any about making a compiler in OCaml.
Here are some books and articles which really helped me:
If you are already familiar with OCaml (like I was), then I would recommend reading the OCaml User Manual, available in many formats for offline reading (I wish they had an EPUB too for Kindle readers).
If you want to learn or have forgotten compiler theory (what was LALR again?), then you can read Modern Compiler Implementation in ML, by Andrew W. Appel. Just Chapter 3 is enough to brush up on parser.
The TOSS tutorial is great at explaining the entire toolchain.
So you will need to read a lot of documentation to understand most OCaml tools. I know some get daunted by long manuals, but they are quite approachable. You just have to read some introductory sections and you should be good to go.
Wiring up a Live Demo
The fun part of the project was building a live demo for the web. The js_of_ocaml tool converts OCaml bytecodes into compact Javascript code. It was surprisingly small. The entire Punchscript interpreter is a single file weighing just 29K gzipped (132K minified)!
The interpreter is invoked from the page using Web workers. There is something magical about watching a web page interact with your OCaml program synthesized from an almost sterile world of functional programming. Web workers makes the whole interaction asynchronous. No browser hangups while your code is running.
Rajinikanth in Enthiran / Robot (2010)
I always wanted the examples to have proper syntax highlighting in Punchscript. I used CodeMirror to build the code editor. Writing a custom syntax highlighter seemed to need a lot of Javascript code. So I heavily derived from the Python syntax highlighting mode.
Taking it Further
Punchscript is both a language and an implementation. Both have potential to grow. Language specs are public and new punch dialogues are welcome. You are also free to create your own implementation in your favourite language. I would be happy to link them.
Have fun coding with punch dialogues!
Thanks to Deepak and Ramakrishnan for reviewing the early drafts of the language specs.
This goes directly to Kerala Chief Minister's Distress Relief Fund. It's easy to use and completely tax exempt. It also welcomes foreign donations.
Relieved to share that most of my family and friends have survived the terrible Kerala floods which has been ravaging for days. Of course, everything is not okay. There is a long and painful road ahead to try rebuild what we have lost. But then there are some losses we might never recover from.
Many friends, colleagues and relatives have been calling from all over the world. Their reactions range from “maybe global warming is real because this is happening everywhere” to “humanity is doomed”. Of course, I am ignoring silly reactions like “must be wrath of god” or “is it fake news”.
Everything these days is seen as a sign of humanity’s impending DOOM. We have sort of turned hollow. Everything seems to be about money or politics. People are supposed to have no other motive or emotion. Forget a soul.
I think we need to remember one really important thing – it is not always about the money. Any species be it animal, bird or insect will help another if they see one of their kind is in trouble.
If an old man collapsed on the road clutching his chest, people wouldn’t first ask which state/country/religion he belongs to before trying to help him. The day we do then trust me we won’t need global warming or even killer robots. Humanity is doomed. Both metaphorically and literally.
Thankfully there is hope. In times of this crisis, I’ve been in constant touch with my friends who are helping in any way possible. Those who can drive are picking up total strangers. Those who can code are rapidly building resilient applications to coordinate rescue. Those who can cook are preparing thousands of food packets and infant food. Even those who cannot afford four square meals a day are donating whatever they can.
Even if there is even one human being somewhere thanking you for your act of kindness, doesn’t it mean something? Isn’t that what the ultimate purpose of our life is - to be useful to someone? To make a difference?
There is an overwhelming humanity around us. And that’s why we will survive. Together.
Django Channels was originally created to solve the problem of handling asynchronous communication protocols like say WebSockets. More and more web applications were providing realtime capabilities like chat and push notifications. Various workarounds were created to make Django support such requirements like running separate socket servers or proxy servers.
Channels is an official Django project not just for handling WebSockets and other forms of bi-directional communication but also for running background tasks asynchronously. As of writing, Django Channels 2 is out which is a complete rewrite based on Python 3’s async/await based coroutines.
This article covers the concepts of Django Channels and leads you to a video tutorial implementing a notifications application in Django.
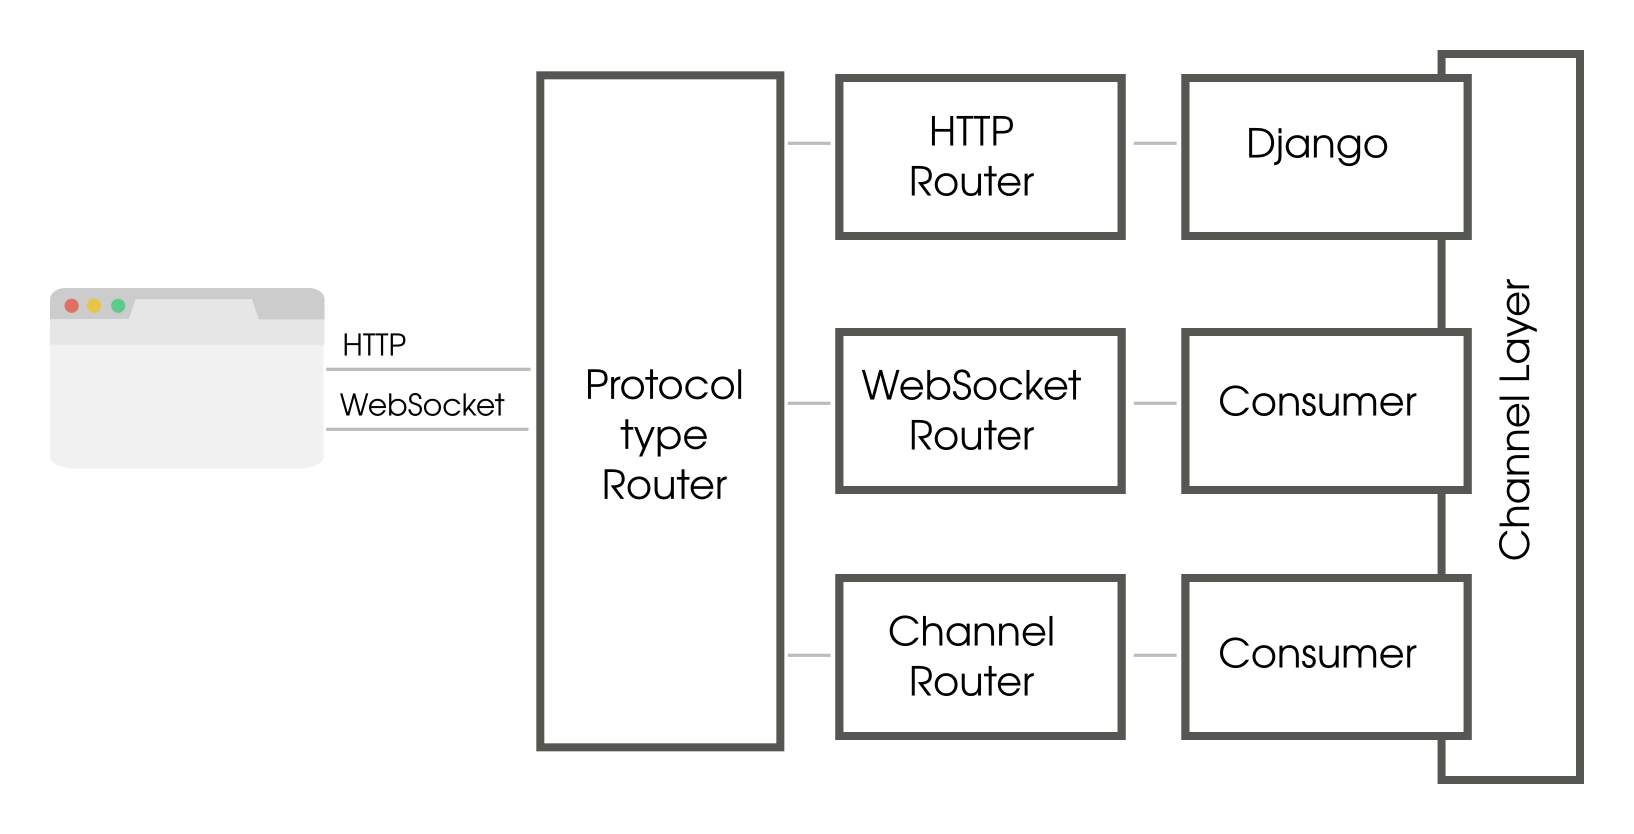
Here is a simplified block diagram of a typical Channels setup:
How a typical Django Channels infrastructure works
A client such as a web browser sends both HTTP/HTTPS and WebSocket traffic to an ASGI server like Daphene. Like WSGI, the ASGI (Asynchronous Server Gateway Interface) specification is a common way for applications servers and applications to interact with each other asynchronously.
Like a typical Django application, HTTP traffic is handled synchronously i.e. when the browser sends a request, it waits until it is routed to Django and a response is sent back. However, it gets a lot more interesting when WebSocket traffic happens because it can be triggered from either direction.
Once a WebSocket connection is established, a browser can send or receive messages. A sent message reaches the Protocol type router that determines the next routing handler based on its transport protocol. Hence you can define a router for HTTP and another for WebSocket messages.
These routers are very similar to Django’s URL mappers but map the incoming messages to a consumer (rather than a view). A consumer is like an event handler that reacts to events. It can also send messages back to the browser, thereby containing the logic for a fully bi-directional communication.
A consumer is a class whose methods you may choose to write either as normal Python functions (synchronous) or as awaitables (asynchronous). Asynchronous code should not mix with synchronous code. So there are conversion functions to convert from async to sync and back. Remember that the Django parts are synchronous. A consumer in fact a valid ASGI application.
So far, we have not used the channel layer. Ironically, you can write Channel applications without using Channels! But they are not particularly useful as there is no easy communication path between application instances, other than polling a database. Channels provides exactly that, a fast point-to-point and broadcast messaging between application instances.
A channel is like a pipe. A sender sends a message to this pipe from one end and it reaches a listener at the other end. A group defines a group of channels who are all listening to a topic. Every consumer listens to own auto-generated channel accessed by its self.channel_name attribute.
In addition to transports, you can trigger a consumer listening to a channel by sending a message, thereby starting a background task. This works as a very quick and simple background worker system.
Building a Channels Application Step-by-step
The following screencast covers the creation of a notification application using Django Channels. You can access the code on Github. The intermediate projects like the Echo Consumer can be accessed as branches of the git repository.
Asyncio is a co-operative multitasking library available in Python since version 3.6. Celery is fantastic for running concurrent tasks out of process, but there are certain times you would need to run multiple tasks in a single thread inside a single process.
If you are not familiar with async/await concepts (say from JavaScript or C#) then it involves a bit of steep learning curve. However, it is well worth your time as it can speed up your code tremendously (unless it is completely CPU-bound). Moreover, it helps in understanding other libraries built on top of them like Django Channels.
This post is an attempt to explain the concepts in a simplified manner rather than try to be comprehensive. I want you to start using asynchronous programming and enjoy it. You can learn the nitty gritties later.
All asyncio programs are driven by an event loop, which is pretty much an indefinite loop that calls all registered coroutines in some order until they all terminate. Each coroutine operates cooperatively by yielding control to fellow coroutines at well-defined places. This is called awaiting.
A coroutine is like a special function which can suspend and resume execution. They work like lightweight threads. Native coroutines use the async and await keywords, as follows:
This is a minimal example of an event loop running one coroutine named sleeper_coroutine. When invoked this coroutine runs until the await statement and yields control back to the event loop. This is usually where an Input/Output activity occurs.
The control comes back to the coroutine at the same line when the activity being awaited is completed (after five seconds). Then then coroutine returns or is considered completed.
Explain async and await
[TLDR; Watch my screencast to understand this section with a lot more code examples.]
Initially, I was confused by the presence of the new keywords in Python: async and await. Asynchronous code seemed to be littered with these keywords yet it was not clear what they did or when to use them.
Let’s first look at the async keyword. Commonly used before a function definition as async def, it indicates that you are defining a (native) coroutine.
You should know two things about coroutines:
Don’t perform slow or blocking operations synchronously inside coroutines.
Don’t call a coroutine directly like a regular function call. Either schedule it in an event loop or await it from another coroutine.
Unlike a normal function call, if you invoke a coroutine its body will not get executed right away. Instead it will be suspended and returns a coroutine object. Invoking the send method of this coroutine will start the execution of the coroutine body.
However, when the coroutine returns it will end in a StopIteration exception. Hence it is better to use the asyncio provided event loop to run a coroutine. The loop will handle exceptions in addition to all other machinery for running coroutines concurrently.
Next we have the await keyword which must be only used inside a coroutine. If you call another coroutine, chances are that it might get blocked at some point, say while waiting for I/O.
>>>asyncdefsleepy():...awaitasyncio.sleep(3)...>>>o=sleepy()>>>loop.run_until_complete(o)# After three seconds>>>
The sleep coroutine from asyncio module is different from its synchronous counterpart time.sleep. It is non-blocking. This means that other coroutines can be executed while this coroutine is awaiting the sleep to be completed.
When a coroutine uses the await keyword to call another coroutines, it acts like a bookmark. When a blocking operation happens, it suspends the coroutine (and all the coroutines who are await-ing it) and returns control back to the event loop. Later, when the event loop is notified of the completion of the blocking operation, then the execution is resumed from the await expression paused and continues onward.
Asyncio vs Threads
If you have worked on multi-threaded code, then you might wonder – Why not just use threads? There are several reasons why threads are not popular in Python.
Firstly, threads need to be synchronized while accessing shared resources or we will have race conditions. There are several types of synchronization primitives like locks but essentially, they involve waiting which degrades performance and could cause deadlocks or starvation.
A thread may be interrupted any time. Coroutines have well-defined places where execution is handed over i.e. co-operative multitasking. As a result, you may make changes to a shared state as long as you leave it in a known state. For instance you can retrieve a field from a database, perform calculations and overwrite the field without worrying that another coroutine might have interrupted you in between. All this is possible without locks.
Secondly, coroutines are lightweight. Each coroutine needs an order of magnitude less memory than a thread. If you can run a maximum of hundreds of threads, then you might be able to run tens of thousands of coroutines given the same memory. Thread switching also takes some time (few milliseconds). This means you might be able to run more tasks or serve more concurrent users (just like how Node.js works on a single thread without blocking).
The downsides of coroutines is that you cannot mix blocking and non-blocking code. So once you enter the event loop, rest of the code driven by it must be written in asynchronous style, even the standard or third-party libraries you use. This might make using some older libraries with synchronous code somewhat difficult.
If you really want to call asynchronous code from synchronous or vice versa, then do read this excellent overview of various cases and adaptors you can use by Andrew Godwin.
The Classic Web-scraper Example
Let’s look at an example of how we can rewrite synchronous code into asynchronous. We will look at a webscraper which downloads pages from a couple of URLs and measures its size. This is a common example because it is very I/O bound which shows a significant speedup when handled concurrently.
Synchronous web scraping
The synchronous scraper uses Python 3 standard libraries like urllib. It downloads the home page of three popular sites and the fourth is a large file to simulate a slow connection. It prints the respective page sizes and the total running time.
Here is the code for the synchronous scraper:
# sync.py"""Synchronously download a list of webpages and time it"""fromurllib.requestimportRequest,urlopenfromtimeimporttimesites=["https://news.ycombinator.com/","https://www.yahoo.com/","https://github.com/",]deffind_size(url):req=Request(url)withurlopen(req)asresponse:page=response.read()returnlen(page)defmain():forsiteinsites:size=find_size(site)print("Read {:8d} chars from {}".format(size,site))if__name__=='__main__':start_time=time()main()print("Ran in {:6.3f} secs".format(time()-start_time))
On a test laptop, this code took 5.4 seconds to run. It is the cumulative loading time of each site. Let’s see how asynchronous code runs.
Asynchronous web scraping
This asyncio code requires installation of a few Python asynchronous network libraries such as aiohttp and aiodns. They are mentioned in the docstring.
Here is the code for the asynchronous scraper – it is structured to be as close as possible to the synchronous version so it is easier to compare:
# async.py"""
Asynchronously download a list of webpages and time it
Dependencies: Make sure you install aiohttp using: pip install aiohttp aiodns
"""importasyncioimportaiohttpfromtimeimporttime# Configuring logging to show timestampsimportlogginglogging.basicConfig(format='%(asctime)s%(message)s',datefmt='[%H:%M:%S]')log=logging.getLogger()log.setLevel(logging.INFO)sites=["https://news.ycombinator.com/","https://www.yahoo.com/","https://github.com/",]asyncdeffind_size(session,url):log.info("START {}".format(url))asyncwithsession.get(url)asresponse:log.info("RESPONSE {}".format(url))page=awaitresponse.read()log.info("PAGE {}".format(url))returnurl,len(page)asyncdefmain():tasks=[]asyncwithaiohttp.ClientSession()assession:forsiteinsites:tasks.append(find_size(session,site))results=awaitasyncio.gather(*tasks)forsite,sizeinresults:print("Read {:8d} chars from {}".format(size,site))if__name__=='__main__':start_time=time()loop=asyncio.get_event_loop()loop.set_debug(True)loop.run_until_complete(main())print("Ran in {:6.3f} secs".format(time()-start_time))
The main function is a coroutine which triggers the creation of a separate coroutine for each website. Then it awaits until all these triggered coroutines are completed. As a best practice, the web session object is passed to avoid re-creating new sessions for each page.
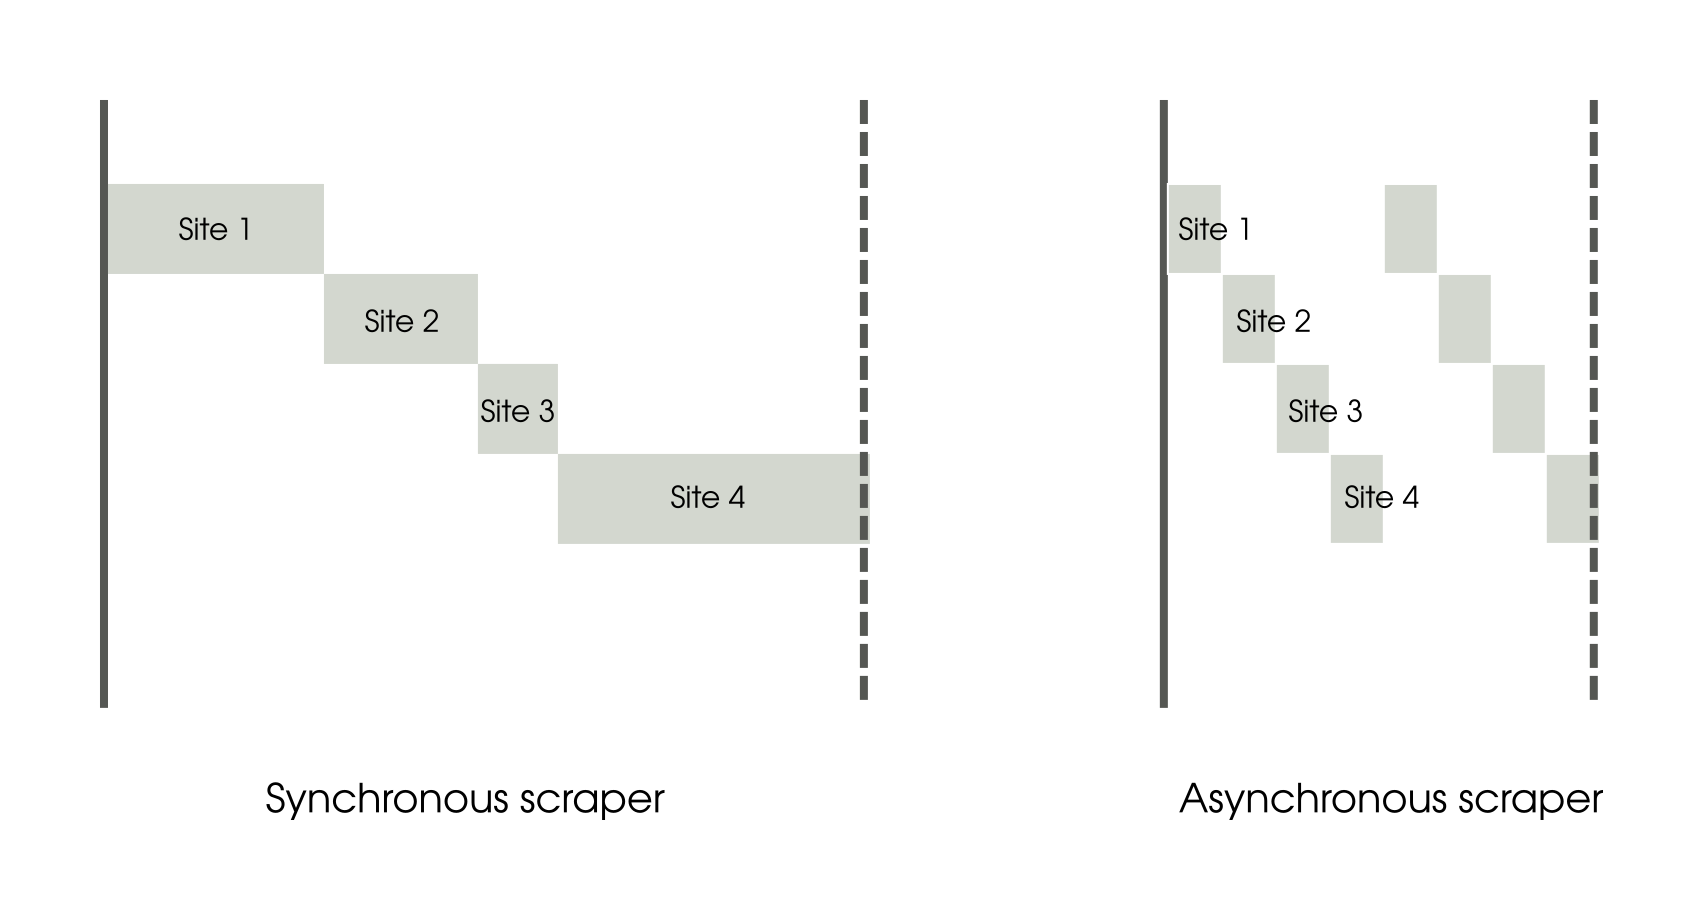
The total running time of this program on the same test laptop is 1.5 s. This is a speedup of 3.6x on the same single core. This surprising result can be better understood if we can visualize how the time was spent, as shown below:
A simplistic representation comparing tasks in the synchronous and asynchronous scrapers
The synchronous scraper is easy to understand. Scraping activity needs very little CPU time and the majority of the time is spent waiting for the data to arrive from the network. Each task is waiting for the previous task to complete. As a result the tasks cascade sequentially like a waterfall.
On the other hand the asynchronous scraper starts the first task and as soon as it starts waiting for I/O, it switches to the next task. The CPU is hardly idle as the execution goes back to the event loop as soon as the waiting starts. Eventually the I/O completes in the same amount of time but due to the multiplexing of activity, the overall time taken is drastically reduced.
In fact, the asynchronous code can be speeded up further. The standard asyncio event loop is written in pure Python and provided as a reference implementation. You can consider faster implementations like uvloop for further speedup (my running time came down to 1.3 secs).
Concurrency is not Parallelism
Concurrency is the ability to perform other tasks while you are waiting on the current task. Imagine you are cooking a lot of dishes for some guests. While waiting for something to cook, you are free to do other things like peeling onions or cutting vegetables. Even when one person cooks, typically there will be several things happening concurrently.
Parallelism is when two or more execution engines are performing a task. Continuing on our analogy, this is when two or more cooks work on the same dish to (hopefully) save time.
It is very easy to confuse concurrency and parallelism because they can happen at the same time. You could be concurrently running tasks without parallelism or vice versa. But they refer to two different things. Concurrency is a way of structuring your programs while Parallelism refers to how it is executed.
Due to the Global Interpreter Lock, we cannot run more than one thread of the Python interpreter (to be specific, the standard CPython interpreter) at a time even in multicore systems. This limits the amount of parallelism which we can achieve with a single instance of the Python process.
Optimal usage of your computing resources require both concurrency and parallelism. Concurrency will help you avoid idling the processor core while waiting for say I/O events. While parallelism will help distribute work among all the available cores.
In both cases, you are not executing synchronously i.e. waiting for a task to finish before moving on to another task. Asynchronous systems might seem to be the most optimal. However, they are harder to build and reason about.
Why another Asynchronous Framework?
Asyncio is by no means the first cooperative multitasking or light-weight thread library. If you have used gevent or eventlet, you might find asyncio needs more explicit separation between synchronous and asynchronous code. This is usually a good thing.
Gevent, relies on monkey-patching to change blocking I/O calls to non-blocking ones. This can lead to hard to find performance issues due to an unpatched blocking call slowing the event loop. As the Zen says, ‘Explicit is better than Implicit’.
Another objective of asyncio was to provide a standardized concurrency framework for all implementations like gevent or Twisted. This not only reduces duplicated efforts by library authors but also ensures that code is portable for end users.
Personally, I think the asyncio module can be more streamlined. There are a lot of ideas which somewhat expose implementation details (e.g. native coroutines vs generator-based coroutines). But it is useful as a standard to write future-proof code.
Can we use asyncio in Django?
Strictly speaking, the answer is No. Django is a synchronous web framework. You might be able to run a seperate worker process, say in Celery, to run an embedded event loop. This can be used for I/O background tasks like web scraping.
However, Django Channels changes all that. Django might fit in the asynchronous world after all. But that’s the subject of another post.


")
")