Django Release Schedule and Python 3

    Do long term releases confuse you? For the longest time I was not sure which version of Ubuntu to download - the latest release or the LTS? I see a number of Django developers confused about Django’s releases. So I prepared this handy guide to help you choose (or confuse?).

    Which Version To Use?

    Django has now standardized on a release schedule with three kinds of releases:

    Feature Release: These releases will have new features or improvements to existing features. It will happen every 8 months and will have 16 months of extended support from release. They have version numbers like A.B (note there’s no minor version).

    Long-Term Support (LTS) Release: These are special kind of feature releases, which have a longer extended support of three years from the release date. These releases will happen every two years. They have version numbers like A.2 (since every third feature release will be a LTS). LTS releases have few months of overlap to aid in a smoother migration.

    Patch Release: These releases are bug fixes or security patches. It is recommended to deploy them as soon as possible. Since they have minimal breaking changes, these upgrades should be painless to apply. They have version numbers like A.B.C

    Django roadmap visualized below should make the release approach clearer:
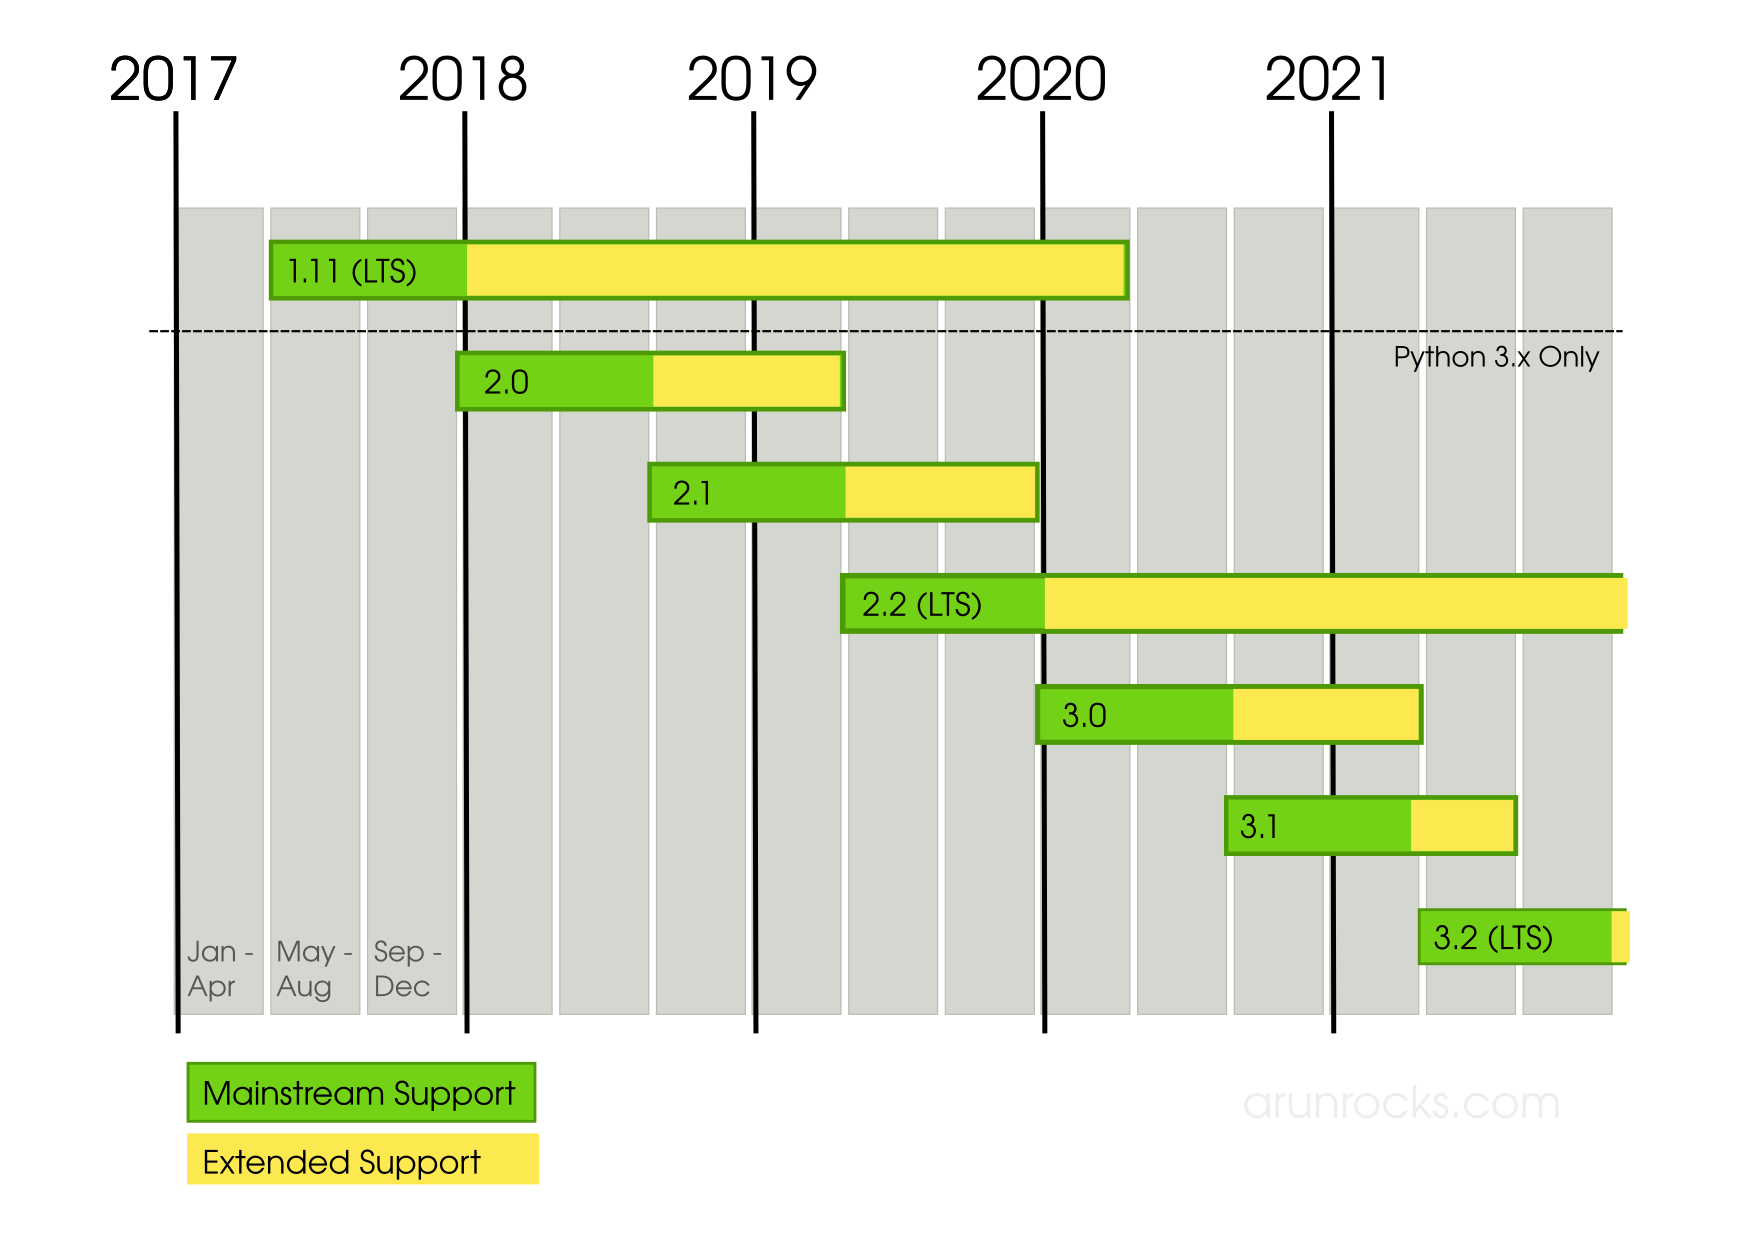
    Django Releases (LTS and feature releases) explained

    The dates are indicative and may change. This is not an official diagram but something that I created for my understanding.

    The big takeaway is that Django 1.11 LTS will be the last release to support Python 2 and it is supported until April 2020. Subsequent versions will use only Python 3.

    The right Django version for you will be based on how frequent you can upgrade your Django installation and what features you need. If your project is actively developed and the Django version can be upgraded at least once in 16 months, then you should install the latest feature release regardless of whether it is LTS or non-LTS.

    Otherwise, if your project is only occasionally developed then you should pick the most recent LTS version. Upgrading your project’s Django dependency from one feature release to another can be a non-trivial effort. So, read the release notes and plan accordingly.

    In any case, make sure you install Patch Releases as soon as they are released. Now, if you are still on Python 2 then read on.

    Python 3 has crossed tipping point

    When I decided to use Python 3 only while writing my book “Django Design Patterns and Best Practices” in 2015, it was a time when Python 2 versus Python 3 was hotly debated. However, to me Python 3 seemed much more cleaner without arcane syntax like class methods named __unicode__ and classes needing to derive from object parent class.

    Now, it is quite a different picture. We just saw how Django no longer supports Python 2 except for the last LTS release. This is a big push for many Python shops to consider Python 3.

    Many platforms have upgraded their default Python interpreter. Starting 1st March 2018, Python 3 is announced to be the default “python” in Homebrew installs. ArchLinux had completely switched to Python 3 since 2010.

    Fedora has switched to Python 3 as its system default since version 23. Even though python command will launch python3, the symlink /usr/bin/python will still point to python2 for backward compatibility. So it is probably a good idea to use #!/usr/bin/env python idiom in your shell scripts.

    On 26 April 2018, when Ubuntu 18.04 LTS (Bionic Beaver) will be released, it is planned to be have Python 3.6 as default. Further upstream, the next Debian release in testing - Debian 10 (Buster) is expected to transition to Python 3.6.

    Moving to packages, the Python 3 Wall of Superpowers shows that with the backing of 190 out of 200 packages, at the time of writing, we have nearly all popular Python packages on Python 3. The only notable package remaining is supervisor, which is about to turn green in supervisor 4.0 (unreleased).

    Common Python 3 Migration Blockers

    You might be aware of atleast one project which is still on Python 2. It could be open source or an internal project, which may be stuck in Python 3 for a number of reasons. I’ve come across a number of such projects and here is my response to such reasons:

    Reason 1: My Project is too complex

    Some very large and complex projects like NumPy or Django have been migrated sucessfully. You can learn the migration strategies of projects like Django. Django maintained a common codebase for Python 2 and 3 using the six (2 × 3=6, get it?) library before switching to Python 3 only.

    Reason 2: I still have time

    It is closer than you think. Python clock shows there is a little more than 2 years and 2 months left for Python 2 support.

    In fact, you have had a lot of time. It has been ten years since Python 3 was announced. That is a lot of overlap to transition from one version to another.

    In today’s ‘move fast and break things’ world, a lot of projects decide to abruptly stop support and ask you to migrate as soon as a new release is out. This is a lot more realistic assumption for enterprises which need a lot more planning and testing.

    Reason 3: I have to learn Python 3

    But you already know most of it! You might need about 10 mins to learn the differences. In fact, I have written a post to guide Django coders to Python 3. Small Django/Python 2 projects need only trivial changes to work on Python 3.

    You might see many old blog posts about Python 3 being buggy or slow. Well, that has not been true for a while. Not only it is extremely stable and bug-free, it is actually used in production by several companies. Performance-wise it has been getting faster in every release, so it is faster than Python 2 in most cases and slower in a few.

    Of course, there are lot of awesome new features and libraries added to Python 3. You can learn them as and when you need them. I would recommend reading the release notes to understand them. I will mention my favourites soon.

    Reason 4: Nobody is asking

    Some people have the philosophy that if nobody is asking then nobody cares. Well, they do care if the application they run is on an unsupported technology. Better plan for the eventual transition than rush it on a higher budget.

    Are you missing out?

    Image by https://pixabay.com/en/users/GlenisAymara-856260/

    To me, the biggest reason to switch was that all the newest and greatest features were coming to Python 3. My favourite top three exclusive features in Python 3 are:

    • asyncio: One of the coolest technologies I picked up recently. The learning process is sometimes mind-bending. But the performance boost in the right situations is incredible.

    • f-strings: They are so incredibly expressive that you would want to use them everywhere. Instant love!

    • dict: New compact dict implementation which uses less memory and are ordered!

    Yes, FOMO is real.

    Apart from my personal reasons, I would recommend everyone to migrate so that the community benefits from investing efforts into a common codebase. Plus we can all be consistent on which Python to recommend to beginners. Because

    There should be one– and preferably only one –obvious way to do it. Although that way may not be obvious at first unless you’re Dutch.

    This article contains an excerpt from the upcoming second edition of book "Django Design Patterns and Best Practices" by Arun Ravindran
    Comments →

    A Gentle Introduction to Creating a Minimal Hugo Site

    When I started using Hugo, I was very impressed by its speed. But I was daunted by the directory structure it creates for a new project. With directory names like archetypes and static, a Hugo site felt unfamiliar and confusing. Fortunately, not every site needs them.

    This post tells you how to start small with just the bare minimum files and directories to build a Hugo site without errors. Being minimal, this site will have only one page (essentially, the home page).

    You can see the finished project on Github. Let’s start looking at only the top-level files of the project:

    .
    ├── config.toml
    ├── content/
    ├── .git/
    ├── .gitignore
    └── themes/
    

    There are only two directories: content which contains your site’s content like posts or articles and themes which are contain various themes - the non-content part of your site like its design and page layouts.

    For Hugo, config.toml contains all the configuration settings of your site like the name of the site, author name, theme etc. For this minimal site, we will only mention two lines:

    baseURL = "http://example.org/"
    theme = "bare"
    

    This is a TOML file. It has a very simple syntax. Each line is written like this:

    key = "value"

    The baseURL value mentions the URL where the site will be published. Strictly speaking, we don’t need it for a minimal site. But Hugo throws an error if baseURL is not specified.

    Next, we mention that we are using the “bare” theme. Essentially, “bare” is a directory inside “themes” directory. We will look at it closely soon.

    The Git files are worth mentioning. I prefer to exclude the generated site (having rendered HTML pages) from Git. Assuming that the generated files will go into a directory named “public”, my .gitignore file is simply this:

    public
    

    Content files

    A content file is usually a text file containing your blog post or article. Typically content files are written in Markdown syntax. But Hugo supports other text formats like Asciidoc, reStructuredText or Org-Mode, which gets converted to HTML. This is easier than directly editing HTML files.

    The only content file in this minimal site is _index.md. This filename is special to Hugo and used to specify a page leading to a list of pages. Typically, an index file is used for a home page, a section, a taxonomy or a taxonomy terms listing.

    Our _index.md looks like this:

    +++
    title = "Home sweet home"
    +++
    
    This page has **bold** and *italics* formatting.
    

    The two +++ separators divides the document into two parts - the front matter (first three lines) in TOML format and the rest of the document in Markdown format. Front matter specifies the metadata of the file like its title, date or category. Most text editors will treat this file as a Markdown file (due to the .md extension) and ignore the front matter.

    Since the _index.md is located inside content directory at the top-level, it will be the first page seen when the user opens the baseURL location i.e. the home page. However, for this page to be rendered, there must be a corresponding template within the theme.

    Theme files

    So far, we have not specified the look and feel of the site. This is typically mentioned in a separate theme directory (it can also be mentioned inside a layouts directory within the site but its more cleaner this way).

    Unlike say Wordpress themes, you might not be able to download an arbitrary Hugo theme and apply it to your site. This is because a theme makes certain assumptions like that your site is a blog and the posts are one-level deep etc, which might not be true in your case. So, I prefer making my own theme while creating new kind of sites. Besides you would eventually want to customize your theme anyway.

    The bare theme is located inside the themes directory. Here is directory structure of that theme:

    themes/
    └── bare/
        ├── layouts/
        │   └── index.html
        └── theme.toml
    

    Note that this is literally a “bare” theme in that it has no stylesheets or images. It can just render a single home page in plain HTML.

    The theme.toml like config.toml contains some metadata about this theme. As seen below, it is fairly self-explanatory:

    name = "Bare"
    license = "MIT"
    

    The layouts directory contains templates which specify how your content files should be rendered into HTML. As you might have guessed, index.html at the top-level is used for rendering a top-level _index.md. This file contains:

    <html>
      <body>
        <h1>Welcome!</h1>
    
        <h2>{{ .Title }}</h2>
        {{ .Content }}
    
      </body>
    </html>
    

    This looks like an HTML page except for parts enclosed in double curly braces ( {{ something }} ). These parts are in Go Template language and will be replaced by their values.

    To understand what .Title means you have to understand that the dot in the beginning refers to the current context, which is the current page. In other programming languages this might be written as ThisPage.Title, but here ThisPage is implied and hence omitted.

    The value for .Title comes from the front matter. While rendering “_index.md”, it will be replaced by “Home sweet home” (refer _index.md mentioned earlier). The value for .Content will be the rendered HTML from the Markdown file.

    Most themes will have certain common elements across a site like a header and footer. Just because we only need a template for one page, the “bare” theme omits all those flourishes.

    You can checkout the finished project at Github. You can use this as a landing page or could be a starting point to a larger Hugo project.

    Rendering and Publishing

    While developing a Hugo site or previewing a post that is being composed, you might want to use the built-in test server. The files are not generated (in the project folder) but you can browse your site locally in your browser

    For local development, execute the following command (in the project directory):

    $ hugo server -w
    

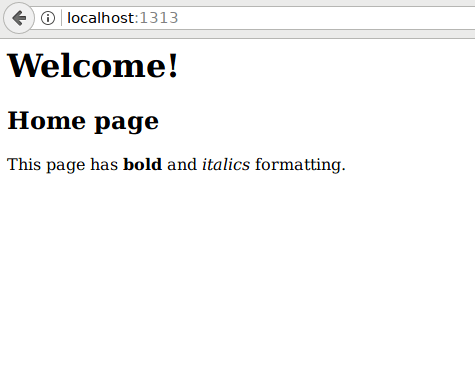
    This is what you should see in your browser:

    Minimal site in hugo

    Once you are ready to publish the site, you’ll need the generate the files into an output directory. The following command will create generate your site into the “public” directory:

    $ hugo --destination public
    

    Now you can copy the files from public directory into the web root of “example.com” or whichever domain that you mentioned as your baseURL. You can use GitHub Pages to host this site for free. I would recommend reading up instructions in their GitHub Pages documentation.

    Next, I would recommend looking at other Hugo sites to understand how various features of Hugo have been used. Personally, I wrote this post so that I have a minimal starting point when I start a new project. Enjoy exploring Hugo!

    Comments →

    Migrating Blogs (Again) from Pelican to Hugo

    Our universe is in a continuous cycle of creation and destruction. How can this humble site escape that cosmic dance? It is time to change the blogging platform of arunrocks.com again.

    You might remember my earlier lengthy justification of using Pelican. I have done numerous hacks and plugins to twist and bend it to my liking. While it has served me well for the past four years, it is time to move on.

    The reason, of course, is a much better static site generator - Hugo. A fairly young but very actively developed project, Hugo has some extremely compelling set of qualities, which made the choice to migrate my site fairly obvious. Some of them are:

    1. Content Organization: Hugo believes in the philosophy that your content should be arranged in the same way they are intended for the rendered website. This brings tremendous clarity in identifying file locations and reduces the need for hacks.

      By default, some blogging engines (including Pelican) assume that all your “pages” will be finally rendered into the pages folder. A configuration setting can change it to use any URL scheme. But why doesn’t it leave it where it was? The source structure is nested and organized. Why flatten it and lose that information?

    2. Extremely Fast: Even if your site contains hundreds of files, the build time is usually under a second, without cached compilation,… inside a virtual machine, … without an SSD. Yes, it is unbelievable.

      This makes the edit-preview development cycle a pleasure to use. Tweak an SCSS variable and the browser will live reload almost instantaneously. I make a hundred tweaks after a page gets rendered, so a short feedback loop is ideal for my workflow.

    3. No Stack: This is usually marketed as the “single executable” advantage of Go applications. But it matters much more profoundly in the case of Hugo.

      Many new languages like Javascript and Python need a pile of third party libraries to make their tools run (even if they are “batteries included”). While it might be easy to setup initially with a single command like pip install Foo, future invocations might need you to update everything to their latest versions first and then fixing whatever breaks.

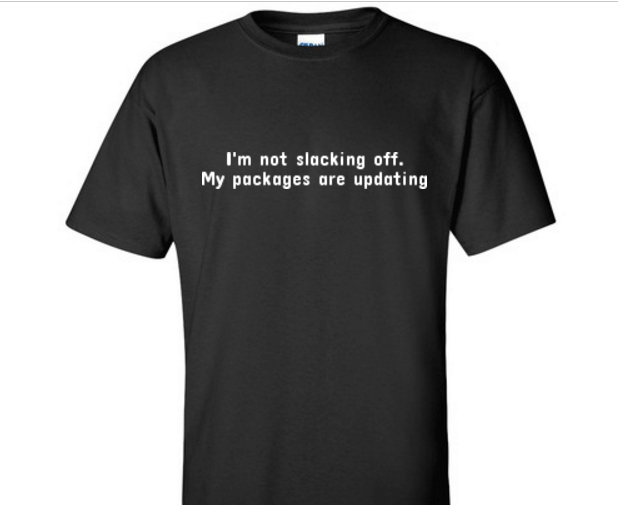
      Slacking Off T shirt

      Even though dynamic languages do not require a lengthy compilation step, a constant stream of updates can get tiring. “Updating my packages”" has become the new “I am compiling”.

      Ok, end of my rant. Hugo is a single self contained executable (in all platforms). This not only reduces the number of moving pieces that you need to keep track of (my requirements.txt for the site listed 20 packages), it simplifies the ongoing maintenance of your site.

      I would rather not have the headache of managing code environments just for writing a blog. In Arch Linux, where I develop my site, it is even easier considering it is a rolling distribution. Hugo automatically updates along with the rest of the system. The updates are usually backward compatible and nothing breaks.

    4. Actively Developed: Many static blog generator projects have this problem. The early days would have the community engaged and actively involved. Then the interest dwindles, code gets stale and the backlog of issues grows. Hugo is still in its early days and has a energetic community. Hopefully the interest will continue to grow.

    5. Not too Blog-oriented: My site, like most personal sites, is predominantly a blog. But it is not just a blog, it is a full-fledged site. Hugo has very minimal assumptions about what kind of site you have. For instance, I can convert a JSON file with all my talks into a Talks page. I just need to define a template for a new type of page in my layouts.

    It is not all Peaches and Cream

    Hugo does have some rough edges. But considering the rate of its development, you might find that all these problems have been solved by the time you read it. But, for the record, I did come across these issues:

    1. Lack of Static Assets Pipeline: I use SCSS to create my CSS files. In general, Hugo is unaware of any static assets pipeline which may involve compiling SCSS, minification or compression. I use a Makefile which invokes the compiler as a dependency for build. Sometimes I need to stop live reloading and explicitly call Make. Since everything is fast, it doesn’t matter much.

      Wasabi restaurant at Tysons Corner Center in McLean, Virginia taken by Ben Schumin

    2. Menu Generation Flaky: I found the “active section in menu” pattern used in most website menus a bit hard to implement. There are others who have faced similar issues. I resorted to not using this pattern for now.

    3. Outdated Blog posts Hugo documentation is extensive and covers a lot of material. But good documentation is very hard to get right. Some sections are confusing and I often look for better explanations say from blogs.

      But one needs to watch out for outdated content. For instance, I needed to change my RSS feed location and one blog recommended changing RSSUri in the config file. This is deprecated. Now, you need to use output formats say like this:

      outputFormats.RSS:
        BaseName: "index"
        Path: "feed/index.xml"
      
    4. Python Tooling: While using Pelican, I was happy that if I needed any additional functionality, I could always write a plugin in Python. This doesn’t worry me for two reasons. First, Hugo’s template system is very expressive and handles many of such needs. Second, ShortCodes offer a much cleaner alternative to plugins.

    5. Inconsistent Casing Sometimes a variable is mentioned in title case in one place and lower case in another. I would end up wondering whether it is copyright or Copyright or CopyRight. Probably, there is a naming convention. But I haven’t found it yet.

    As you can see, most of these issues are solvable. Hugo is a long way from version 1.0 (currently we have v20.7). So this might all be fixed by then.

    Changing a Jet Engine Mid-flight

    Once your site achieves a certain amount of traffic, then making any change is fraught with risk. Every time I change this site’s underlying platform I make a short TODO list. It looks something like this:

    • Setup Redirects: Map the old link structure to the new ones
    • Fix Renders: Markdown is not quite a standard. Each Markdown engine has its own quirk. I manually check the rendered HTML is some cases.
    • Check Missing Images: Things have to move around to adjust for various source layouts. So images, scripts or download links can return 404s.

    Even after all these checks, I still need to watch the error log for omissions. As this happens in my spare time, the whole migration “project” takes months. It is pretty much like changing a jet’s engine mid-flight.

    Some Takeaways

    In short, I would say you can never underestimate the sheer amount of work involved in migrating a site. There is a very good post on site migration by folks at Mozilla that covers many aspects that people tend to miss. Unless you have very good reasons to move, I would suggest that you stick with your blogging platform of choice.

    As for me, time to start thinking about migration to HTTPS 😉

    Comments →

    Hangman in more than three lines of Python

    Recently, Danver wrote about a brilliant implementation of the Hangman game in just three lines of Python. But the shortened code might be hard to understand. In this post we will rewrite his code in a more idiomatic Python 3 style.

    Spoiler Alert: If you prefer a fun exercise, try doing it yourself first and then compare with my version.

    Danver’s implementation cleverly uses the system dictionary (pre-installed in Linux and Mac, but we’ll see how it can work in Windows too) for picking a random word. It also displays a neat ASCII-art hangman at every step. Except for a few minor improvements, I have tried to retain the essence of Danver’s original in my rewrite below.

    # -*- coding: utf-8 -*-
    """A simple text-based game of hangman
    
    A re-implementation of Hangman 3-liner in more idiomatic Python 3
    Original: http://danverbraganza.com/writings/hangman-in-3-lines-of-python
    
    Requirements:
      A dictionary file at /usr/share/dict/words
    
    Usage:
      $ python hangman.py
    
    Released under the MIT License. (Re)written by Arun Ravindran http://arunrocks.com
    
    """
    
    import random
    
    DICT = '/usr/share/dict/words'
    chosen_word = random.choice(open(DICT).readlines()).upper().strip()
    guesses = set()
    scaffold = """
    |======
    |   |
    | {3} {0} {5}
    |  {2}{1}{4}
    |  {6} {7}
    |  {8} {9}
    |
    """
    man = list('OT-\\-//\\||')
    guesses_left = len(man)
    
    while not guesses.issuperset(chosen_word) and guesses_left:
        print("{} ({} guesses left)".format(','.join(sorted(guesses)), guesses_left))
        print(scaffold.format(*(man[:-guesses_left] + [' '] * guesses_left)))
        print(' '.join(letter if letter in guesses else '_' for letter in chosen_word))
        guesses.update(c.upper() for c in input() if str.isalpha(c))
        guesses_left = max(len(man) - len(guesses - set(chosen_word)), 0)
    
    if guesses_left > 0:
        print("You win!")
    else:
        print("You lose!\n{}\nHANGED!".format(scaffold.format(*man)))
    print("Word was", chosen_word)
    

    You can view or download the gist on Github as well.

    HO_ IT _ORKS

    The code makes excellent use of Python’s built-in set data structure and string format function.

    Right after a boring module docstring and the import statement, we initialize the following variables:

    • DICT: Path to a dictionary file
    • chosen_word: Randomly picked line (aka. a word) from DICT
    • guesses: Set of letters guessed by the user, so far
    • scaffold: Hangman drawn in ASCII art as a format string
    • man: Missing ASCII characters for scaffold
    • guesses_left: Remaining letter guesses

    The while loop, whose exit condition will be explained soon, is our main game loop. The first print function reminds you the guesses you have entered so far (in alphabetic order) and the number of guesses left. The next print function shows the ASCII hangman with enough missing parts from man based on the number of wrong guesses.

    Finally, the third print function shows the chosen_word by revealing only the characters from your guesses and replacing the rest with underscores. In the following line, we read a character or even several characters from the user, uppercase them, filter out the non-alphabets and update the guesses set, all in a single line:

    guesses.update(c.upper() for c in input() if str.isalpha(c))
    

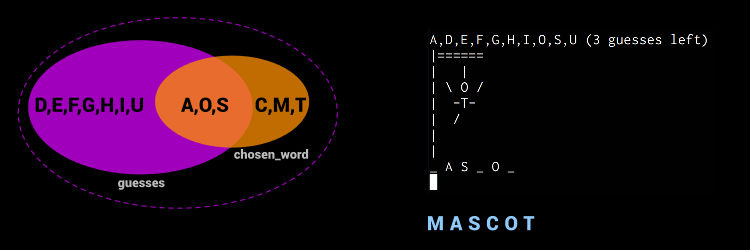
    Next, we calculate the number of letters we got wrong. As the diagram below shows, this is the difference of the sets guesses and chosen_words (In the diagram, the letters - C,M,T). We find how many guesses are left by subtracting the set of letters of man from the letters we got wrong. The max function ensures that we don’t go below zero.

    Hangman logic explained through sets

    Eventually, you could win if your guesses cover all the right letters. In the language of sets, this is when guesses set grows large enough to become a super set of chosen_word set. This is indicated by the dashed purple circle. Hence, the while loop will continue until this happens or we run out of remaining guesses.

    Finally, we show a win or lose message based on whether we ran out of guesses. In either case we reveal the initial chosen_word.

    IMPRO_EMEN_S

    For comparison, here is Danver’s original three-liner:

    license, chosen_word, guesses, scaffold, man, guesses_left = 'https://opensource.org/licenses/MIT', ''.join(filter(str.isalpha, __import__('random').choice(open('/usr/share/dict/words').readlines()).upper())), set(), '|======\n|   |\n| {3} {0} {5}\n|  {2}{1}{4}\n|  {6} {7}\n|  {8} {9}\n|', list('OT-\\-//\\||'), 10
    while not all(letter in guesses for letter in chosen_word) and guesses_left: _, guesses_left = map(guesses.add, filter(str.isalpha, raw_input('%s(%s guesses left)\n%s\n%s:' % (','.join(sorted(guesses)), guesses_left, scaffold.format(*(man[:10-guesses_left] + [' '] * guesses_left)), ' '.join(letter if letter in guesses else '_' for letter in chosen_word))).upper())), max((10 - len(guesses - set(chosen_word))), 0)
    print 'You', ['lose!\n' + scaffold.format(*man), 'win!'][bool(guesses_left)], '\nWord was', chosen_word
    

    Got it? Okay, maybe it needs a bit of explanation. Python is a whitespace-aware language designed for maximum readability. So it takes a lot of questionable tricks to write one-liners, some of which I have used myself in my post “Python One-liner Games”. This time we are going in the opposite direction.

    Probably, the most visible changes are:

    • License: Mentioned in a doc string rather than as a string
    • Import: No longer need to use the internal __import__ function
    • Scaffold: Multi-line string rather than a one-liner
    • Print: Changed from a statement to a function, as in Python 3
    • Raw_input: Changed to an input function, as in Python 3
    • C-style %s formats: Replaced with str.format everywhere

    But, there are also some less evident code changes:

    • Loop condition: Replaced list comprehension in while condition with a superset check
    • Negative index: No need of man[:10-guesses_left], just man[:-guesses_left]
    • Set update: Replace map/filter with a set.update i.e. from this:
        map(guesses.add, filter(str.isalpha, raw_input...
    
    with this:
    
        guesses.update(c.upper() for c in input() if str.isalpha(c))
    
    • Magic numbers: The number 10 is no longer hard-coded and replaced with len(man)

    As you can see, I have preferred set functions over list comprehensions. The choice of set functions like my_set.update over set operators like my_set += was intentional as the former allows any iterable as an argument and not just sets. In most cases, I have used generator expressions for efficiency.

    W_Y PYT_ON 3?

    I must admit that the actual reason I rewrote the Hangman was because it didn’t work on my Arch Linux box, which runs on Python 3. Over the last few months, I have completely switched over all my projects (and my book) to Python 3. So far I have had no reason to complain.

    Apart from the syntactic differences, you will find some solid advantages of using Python 3 versus Python 2:

    1. Unicode files: Since the dictionary file path can be changed, I created a test file with a few Malayalam words in separate lines. The Python 2 version just exits with a win message. This is probably because str.isalpha filters out all the characters. Whereas, in Python 3, everything just works.

    2. Removes arcane forms: No more raw_input (who uses the old input?) or print statements

    If you are on Windows, you can download pretty much any of the dictionaries online (even the offensive ones) and change the path in DICT to something like dict.txt. Or, you can create a simple text file with one word on each line. Pro Tip: Hangman is great for learning foreign languages so try creating a Unicode file with some foreign language words.

    Before any of the Python 2 fans lash out on me, let me note in the passing that this code will work perfectly on Python 2.7+ if you replace input with raw_input. Cheers!

    FI_AL COMME_T

    This post is by no means a critique of Danver’s code. In fact, I loved his implementation and totally didn’t waste my weekend playing Hangman (27 wins out of 30 games!!!). It had a lot of fun mapping the problem to sets and making small improvements.

    Hope you found some new Python best practices or just an awesome word game to kill time!

    Comments →

    Python 3 Cheatsheet for Djangonauts

    If you are already convinced to use Python 3 then you can directly jump to the section “Python 2 vs Python 3” for the cheatsheet

    There is an intense debate whenever Python 3 is mentioned. Some think it is an unnecessary shift and Python 2 series should be continued. However, I chose Python 3 for my book because I strongly believe that it is the future of the language. Besides, the divide might not be as large you think.

    Why Python 3?

    Think of your favourite programming language and what you love about it. Now think of things that you don’t like about it or wish was improved. Sometimes these improvements might break older codebases but you badly want them.

    Now imagine if the creator of the language takes upon himself/herself to revamp the language and rid of its warts. This is what actually led to Python 3 - Guido led the efforts to clean-up some fundamental design flaws with the 2.x series based on over fifteen years of experience developing a successful language.

    While the development of Python 3 started in 2006, its first release, Python 3.0, was on December 3, 2008. The main reasons for a backwards incompatible version were – switching to Unicode for all strings, increased use of iterators, cleanup of deprecated features like old-style classes and some new syntactic additions like the nonlocal statement.

    Python 2.7 development was supposed to end in 2015 but was extended for five more years through 2020. There will not be a Python 2.8. Soon all major Linux distributions would have completely switched to using Python 3 as a default. Many PaaS providers like Heroku already support Python 3.4.

    Python 2 and Python 3 have been in parallel development by the core development team for a number of years. Eventually, Python 3 is expected to be the future of the language.

    Porting Django

    The reaction to Python 3 in the Django community was rather mixed. Even though the language changes between version 2 and 3 were small (and over time, reduced), porting the entire Django codebase was a significant migration effort.

    Django has been supporting Python 3 since version 1.5. In fact, the strategy was to rewrite the code into Python 3 and deal with Python 2 as a backward compatibility requirement.

    Most of the packages listed in the Python 3 Wall of Superpowers have turned green (indicating they have support for Python 3). Almost all the red ones have an actively developed Python 3 port. Also worth noting is the Django Wall of Superpowers with over 67% of the top 200 Django packages having a Python 3 port.

    Python 3 Advantage

    Many newcomers to Django wonder whether to start using Python 2 or 3. I recommend starting with Python 3 for the following reasons:

    1. Better syntax: It fixes a lot of ugly syntax like izip, xrange and __unicode__ with the cleaner and more straightforward zip, range and __str__.

    2. Sufficient third-party support: Of the top 200 third party libraries, more than 80% have Python 3 support.

    3. No legacy code: Since they are creating a new project rather than dealing with legacy code which needs to support an older version.

    4. Default in Modern Platforms: It is already the default Python interpreter in Arch Linux. Ubuntu and Fedora plan to complete the switch in a future release.

    5. It is easy: From a Django development point of view, there are so few changes that it can be learnt in a few minutes.

    The last point is important. Even if you know Python 2, you can pick up Python 3 in a short time.

    Python 2 vs Python 3

    This section covers the most important changes in Python 3 from a Django developer’s perspective. To understand the full list of changes, please refer to the recommended reading section in the end.

    The examples are given in both Python 2 and Python 3. Depending on your installation, all Python 3 commands might need to be changed from python to python3 or python3.4 to invoke the interpreter.

    Change all __unicode__ methods into __str__

    In Python 3, the __str__() method is called for string representation of your models rather than the awkward sounding __unicode__() method. This is one of the most evident ways to identify Python 3 ported code.

    Python 2 Python 3

    class Person(models.Model): name = models.TextField()

    def unicode(self): return self.name

    class Person(models.Model): name = models.TextField()

    def str(self): return self.name

    This reflects the difference in the way Python 3 treats strings. In Python 2, the human readable representation of a class could be returned by __str__() (bytes) or __unicode__() (text). However, in Python 3 the readable representation is simply returned by __str__() (text).

    All Classes Inherit from object

    Python 2 has two kinds of classes – old-style (classic) and new-style. New-style classes are classes which directly or indirectly inherit from object. Only new style classes can use Python’s advanced features like slots, descriptors and properties. Many of these are used by Django. However, classes were still old-style by default for compatibility reasons.

    In Python 3, the old-style classes don’t exist anymore. As seen below, even if you don’t explicitly mention any parent classes the object class will be present as a base. So, all classes are new-style.

    Python 2 Python 3

    >>> class CoolMixin: … pass >>> CoolMixin.bases ()

    >>> class CoolMixin: … pass >>> CoolMixin.bases (<class ‘object’>,)

    Calling super() is Easier

    The simpler call to super(), without any arguments, will save you some typing in Python 3.

    Python 2 Python 3
    class CoolMixin(object):
    

    def do_it(self): return super(CoolMixin, self).do_it()

    class CoolMixin:
    

    def do_it(self): return super().do_it()

    Specifying the class name and instance is optional, thereby making your code DRY and less prone to errors while refactoring.

    Relative Imports Must be Explicit

    Imagine the following directory structure for a package named app1:

    /app1
      /__init__.py
      /models.py
      /tests.py
    

    Now, in Python 3, let us run the following in the parent directory of app1:

    $ echo "import models" > app1/tests.py
    $ python -m app1.tests
    Traceback (most recent call last):
       ... omitted ...
    ImportError: No module named 'models'
    $ echo "from . import models" > app1/tests.py
    $ python -m app1.tests
    

    Successfully import-ed

    Within a package, you should use explicit relative imports while referring to a sibling module. You can omit __init__.py in Python 3, though it is commonly used to identify a package.

    In Python 2, you could use import models to successfully import models.py module. But it was ambiguous and could accidentally import any other models.py in your Python path. Hence this is forbidden in Python 3 and discouraged in Python 2 as well. Use from . import models instead.

    HttpRequest and HttpResponse have str and bytes Types

    In Python 3, according to PEP 3333 (amendments to the WSGI standard), we are careful not to mix data coming from or leaving via HTTP, which will be in bytes; as opposed to text within the framework, which will be native (Unicode) strings.

    Essentially, for HttpRequest and HttpResponse objects:

    • Headers will be always str objects
    • Input and output streams will be always byte objects

    Unlike Python 2, the string and bytes are not implicitly converted while performing comparisons or concatenations with each other. Strings mean Unicode strings only.

    Exception Syntax Changes and Improvements

    Exception handling syntax and functionality has been significantly improved in Python 3.

    In Python 3, you cannot use the comma separated syntax for the except clause. Use the as keyword instead:

    Python 2 Python 3
    try:
      pass
    except BaseException, e:
      pass
      
    try:
      pass
    except BaseException as e:
      pass
      

    The new syntax is recommended for Python 2 as well.

    In Python 3, all exceptions must be derived (directly or indirectly) from BaseException. In practice, you would create your custom exceptions by deriving from the Exception class.

    As a major improvement in error reporting, if an exception occurs while handling an exception then the entire chain of exceptions are reported:

    Python 2 Python 3
    >>> try:
    ...   print(undefined)
    ... except Exception:
    ...   print(oops)
    ...
    Traceback (most recent call last):
      File "", line 4, in <module>
      NameError: name 'oops' is not defined
    
    >>> try:
    ...   print(undefined)
    ... except Exception:
    ...   print(oops)
    ...
    Traceback (most recent call last):
      File "<stdin>", line 2, in <module>
      NameError: name 'undefined' is not defined
    

    During the handling of the preceding exception, another exception occurred:

    Traceback (most recent call last): File “<stdin>”, line 4, in <module> NameError: name ‘oops’ is not defined

    Once you get used to this feature, you will definitely miss it in Python 2.

    Standard Library Reorganized

    The core developers have cleaned-up and better organized the Python standard library. For instance SimpleHTTPServer now lives in the http.server module:

    Python 2 Python 3
    $ python -m SimpleHTTPServer
    Serving HTTP on 0.0.0.0 port 8000 ...
      
    $ python -m http.server
    Serving HTTP on 0.0.0.0 port 8000 ...
      

    New Goodies

    Python 3 is not just about language fixes. It is also where bleeding-edge Python development happens. This means improvements to the language in terms of syntax, performance and built-in functionality.

    Some of the notable new modules added to Python 3 are:

    • asyncio : Asynchronous I/O, event loop, coroutines and tasks
    • unittest.mock : Mock object library for testing
    • pathlib : Object-oriented filesystem paths
    • statistics : Mathematical statistics functions

    Even if some of these modules might have backports to Python 2, it is more appealing to migrate to Python 3 and leverage them as built-in modules.

    Pyvenv and Pip are Built-in

    Most serious Python developers prefer to use virtual environments. virtualenv is quite popular to isolate your project setup from the system-wide Python installation. Thankfully, Python 3.3 is integrated with a similar functionality using the venv module.

    Since Python 3.4, a fresh virtual environment will be pre-installed with pip, a popular installer:

    $ python -m venv djenv
    [djenv] $ source djenv/bin/activate
    [djenv] $ pip install django
    

    Notice that the command prompt changes to indicate that your virtual environment has been activated.

    Other Changes

    We cannot possibly fit all the Python 3 changes and improvements in this post. But the other commonly cited changes are:

    1. print is now a function : Previously it was a statement i.e. arguments were not in parenthesis.
    2. Integers don’t overflow : sys.maxint is outdated, integers will have unlimited precision.
    3. Inequality operator <> is removed : Use != instead.
    4. True Integer Division : In Python 2, 3 / 2 would evaluate to 1. It will be correctly evaluated to 1.5 in Python 3.
    5. Use range instead of xrange : range() will now return iterators as xrange() used to work before.
    6. Dictionary keys are views : dict and dict-like classes (like QueryDict) will return iterators instead of lists for keys(), items() and values() method calls.

    This article is an excerpt from the book "Django Design Patterns and Best Practices" by Arun Ravindran

    Further Information

    Comments →

    « Newer Page 5 of 39 Older »