Building a Hacker News clone in Django - Part 3 (Comments and CRUD)

    You are reading a post from a four-part tutorial series

    It feels like ages since part 2 was out. Meanwhile, the movie Man of Steel has actually been released. So there is really no need to check for rumors about what that movie is all about. Probably the industry is now abuzz with rumours about its sequel instead.

    In this tutorial, I would be showing how to use features like comments and CRUD views which are integral to a social site. You can choose to watch the video or read the step by step description below or follow both. The goodies pack which was introduced in the last part has been updated and would be used again to save time to create templates.

    This video would be a continuation of the previous video and I recommend watching it. Click on the image below to watch the screencast or scroll down to read the steps.

    Screencast

    Enjoyed this tutorial? Then you should sign up for my upcoming book “Building a Social News Site in Django”. It tries to explain in a learn-from-a-friend style how websites are built and gradually tackles advanced topics like testing, security, database migrations and debugging.

    Step-by-step Instructions

    Here is the text version of the video for people who prefer to read. In part 2, we showed you how to create a beta-like site to publish rumors about “Man of Steel” where users can sign-up and create their own profiles.

    The outline of Part 3 of the screencast is:

    • Comments framework
    • Create/Read/Update/Delete of a Link
    • Pagination

    Get the goodies pack again

    The goodies pack has changed since the last tutorial, so I would recommend downloading it again.

    1. Download sr-goodies-master.zip to any convenient location. On Linux, you can use the following commands to extract it to the /tmp directory.

          cd /tmp
          wget https://github.com/arocks/sr-goodies/archive/master.zip
          unzip master.zip
      

      Explore the extracted files in /tmp/sr-goodies-master

    Pagination

    So far we have been seeing just the first page of the list of links. But we are using Django’s ListView which provides pagination. Let’s implement a simple ‘Next’ link to visit the next page.

    1. Add the following snippet to steelrumors/templates/links/link_list.html just before {% endblock %}:

          {% if is_paginated %}
          <div class="pagination">
              {% if page_obj.has_next %}
              <a href="?page={{ page_obj.next_page_number }}">More &raquo;</a>
              {% endif %}
          </div>
          {% endif %}
      
    2. In the same template file we’ll need to change the first <ol> tag to ensure that the line numbers in page 2 and later appear correctly. Replace that line with <ol> with these lines:

          {% if is_paginated %}
          <ol start="{{ page_obj.start_index }}">
          {% else %}
          <ol>
          {% endif %}
      

      Now you can visit every page and read every submitted link!

    1. We have been using the admin interface to create/update/delete links. But this is only accessible to staff members. To allow users to submit links, we will need a new form, a new view class (generic CBV) and a new template with a form.

      Add this new ModelForm to `links/forms.py`:
      
          from .models import Link
          ...
      
          class LinkForm(forms.ModelForm):
              class Meta:
                  model = Link
                  exclude = ("submitter", "rank_score")    
      
    2. Time to implement the “C” of CRUD by importing CreateView and the form you just created:

      Add the `LinkCreateView` class to `links/views.py`:
      
          from django.views.generic.edit import CreateView
          from .forms import LinkForm
          ...
      
          class LinkCreateView(CreateView):
              model = Link
              form_class = LinkForm
      
              def form_valid(self, form):
                  f = form.save(commit=False)
                  f.rank_score = 0.0
                  f.submitter = self.request.user
                  f.save()
      
                  return super(CreateView, self).form_valid(form)
      
    3. Copy link_form.html from goodies to steelrumors/templates/links/link_form.html:

          cp /tmp/sr-goodies-master/templates/links/link_form.html \
             ~/proj/steelrumors/steelrumors/templates/links/
      
    4. Add this view in steelrumours/urls.py:

          from links.views import LinkCreateView        
      
          url(r'^link/create/$', auth(LinkCreateView.as_view()),
              name='link_create'),
      

      Visit http://127.0.0.1:8000/link/create/ and submit a new link. Remember, you’ll need to be logged in to submit links.

    5. If you try to submit a link, you will see an error message asking you to “Either provide a url or define a get_absolute_url method on the Model.” So let’s define the get_absolute_url method.

      Add the following method in the Link class:

          from django.core.urlresolvers import reverse
          ...
      
          def get_absolute_url(self):
              return reverse("link_detail", kwargs={"pk": str(self.id)})
      
    6. Create a DetailView in links/views.py. This is the “R” of CRUD.

          from django.views.generic import DetailView
          ...
      
          class LinkDetailView(DetailView):
              model = Link
      
    7. Copy link_detail.html from goodies to steelrumors/templates/links/link_detail.html:

          cp /tmp/sr-goodies-master/templates/links/link_detail.html \
             ~/proj/steelrumors/templates/links/
      
    8. Add this detail view in steelrumours/urls.py:

          from links.views import LinkDetailView        
      
          url(r'^link/(?P<pk>\d+)/$', LinkDetailView.as_view(),
              name='link_detail'),
      

      Try submitting the add link form again and it should take you to the detail page, without error.

    9. For convenience, let’s add the urls to these new views in our template so that users can easily find them. Add only the line with a + sign to base.html (remove the + sign):

          {% if user.is_authenticated %}
          +   <a href="{% url 'link_create' %}">Submit Link</a> | 
              <a href="{% url 'logout' %}">Logout</a> |
      

      Make the following change (changed line starts with a + sign) to steelrumors/templates/links/link_list.html:

          {% for link in object_list %}
              <li> [{{ link.votes }}]
          +   <a href="{% url 'link_detail' pk=link.pk %}">
                <b>{{ link.title }}</b>
      

      Refresh the steelrumours site on your browser and check if all the links work correctly.

    CRUD - Update and Delete

    1. The remaining two views for Update and Delete are straight forward and we can add them together. We are going to reuse the LinkForm, so let’s start with views.

      Add these view classes to links/views.py:

          from django.core.urlresolvers import reverse_lazy
          from django.views.generic.edit import UpdateView
          from django.views.generic.edit import DeleteView
          ...
      
          class LinkUpdateView(UpdateView):
              model = Link
              form_class = LinkForm
      
          class LinkDeleteView(DeleteView):
              model = Link
              success_url = reverse_lazy("home")
      
    2. Copy link_confirm_delete.html from goodies to steelrumors/templates/links/link_confirm_delete.html:

          cp /tmp/sr-goodies-master/templates/links/link_confirm_delete.html \
             ~/proj/steelrumors/templates/links/
      
    3. Add these views in steelrumours/urls.py:

          from links.views import LinkUpdateView
          from links.views import LinkDeleteView
      
              url(r'^link/update/(?P<pk>\d+)/$', auth(LinkUpdateView.as_view()),
                  name='link_update'),
              url(r'^link/delete/(?P<pk>\d+)/$', auth(LinkDeleteView.as_view()),
                  name='link_delete'),
      
    4. Finally, for convenience, add these lines (with + sign) to steelrumors/templates/links/link_detail.html:

          <h2><a href="{{ object.link }}">{{ object.title }}</a></h2>
          + {% if object.submitter == user %}
          +  <a href="{% url 'link_update' pk=object.pk %}">Edit</a> | 
          +  <a href="{% url 'link_delete' pk=object.pk %}">Delete</a>
          + {% endif %}
      

      Now, you can create, read, update and delete Link objects. Try it!

    Enabling Comments

    1. We are going to add comments to the link detail pages using the built-in Django comments framework. First add this applications in steelrumors/settings.py:

          INSTALLED_APPS = (
      
              'django.contrib.admin',
          +    'django.contrib.comments',
      

      Run syndb to create the tables required by the comments app:

          ./manage.py syncdb
      
    2. Copy the new link_detail.html page from the goodies pack:

          cp /tmp/sr-goodies-master/templates/links/link_detail2.html \
             ~/proj/steelrumors/templates/links/link_detail.html
      
    3. We need to show comment counts in the front page itself. So add the following lines to steelrumors/templates/links/link_list.html at the beginning and middle of the template:

          {% extends "base.html" %}
          + {% load comments %}
          ...
      
          <a href="{% url 'link_detail' pk=link.pk %}">
          <b>{{ link.title }}</b>
          +  {% get_comment_count for link as comment_count %}
          +  {{ comment_count }} comment{{ comment_count|pluralize }}
          </a>
      
    4. Add this line to steelrumours/urls.py for wiring up the comments app:

              url(r'^comments/', include('django.contrib.comments.urls')),
      

      Now, open any link detail page and have fun writing comments!

    Fun with Random Gossip

    Add a mixin class called RandomGossipMixin in links/views.py before LinkListView class:

    from django.contrib.comments.models import Comment
    ...
    
    class RandomGossipMixin(object):
        def get_context_data(self, **kwargs):
            context = super(RandomGossipMixin, self).get_context_data(**kwargs)
            context[u"randomquip"] = Comment.objects.order_by('?')[0]
            return context
    

    Change the class declaration of LinkListView to include this mixin as a base class:

    class LinkListView(RandomGossipMixin, ListView):
    

    Add the following lines to steelrumors/templates/links/link_list.html before the endblock line:

    <blockquote style="background-color: #ddd; padding: 4px; border-radius: 10px; margin: 10px 0; color: #666; font-size: smaller; text-shadow: rgba(255,255,255,0.8) 1px 1px 0;">
    {{ randomquip.comment|truncatechars:140 }}
    </blockquote>


    Now refresh the home page and enjoy a random comment appear at the bottom of the page.

    Final Comments

    We have a lot more feature-complete social news site at this point. Users can actually submit links and comment about them. In the next and concluding part, we will cover writing mixins and ranking algorithms in Django. With this users will be able to vote and influence the ranking of links.

    That concludes Part 3. Follow me on Twitter at @arocks to get updates about upcoming parts.

    EDIT: Check out Part 4!

    Resources

    Comments →

    Building a Hacker News clone in Django - Part 2 (User Profiles and Registrations)

    You are reading a post from a four-part tutorial series

    It has been more than a week since the first part of this tutorial series was posted and I’ve been getting positive feedback from several channels. Ironically, it was extremely popular on Hacker News. It was even translated into Chinese.

    To be sure, the objective was not to create a full featured clone of any website. The real objective is to learn Django using a medium-sized project that utilises it to the fullest. Many tutorials fall short of bringing together various parts of Django. Compared to a microframework like Flask (which is also great, btw), Django comes with a lot of batteries included. If you are short on time, this makes it ideal for completing an ambitious project like this.

    This tutorial would show you how to implement social features like supporting user registration and profile pages. We will leverage Django’s class based views for building CRUD functionality. There is a lot of ground to be covered this time.

    As before, there is a text description of the steps if you do not prefer to watch the entire video. There is also a goodies pack with templates and other assets included, which would be required if you are following this tutorial.

    This video would be a continuation of the previous video and I recommend watching it. Click on the image below to watch the screencast or scroll down to read the steps.

    Screencast

    Enjoyed this tutorial? Then you should sign up for my upcoming book “Building a Social News Site in Django”. It tries to explain in a learn-from-a-friend style how websites are built and gradually tackles advanced topics like testing, security, database migrations and debugging.

    Step-by-step Instructions

    Here is the text version of the video for people who prefer to read. In part 1, we showed you how to create a private beta-like site to publish rumors about “Man of Steel”.

    The outline of Part 2 of the screencast is:

    • Better branding and templates
    • Custom login/logout
    • Sociopath to actually social - django-registrations
    • Simple registration
    • User Profiles

    Open the goodies pack

    So far, the appearance of the website looks a bit bland. Let’s use some assets which are pre-designed for the tutorial.

    1. Download sr-goodies-master.zip to any convenient location. On Linux, you can use the following commands to extract it to the /tmp directory.

          cd /tmp
          wget https://github.com/arocks/sr-goodies/archive/master.zip
          unzip master.zip
      

      Explore the extracted files in /tmp/sr-goodies-master

    2. Copy the entire static directory from the extracted files to steelrumors/steelrumors. Also, overwrite the extracted sr-goodies-master/templates/base.html template into steelrumors/steelrumors/templates/

          cp -R /tmp/sr-goodies-master/static ~/proj/steelrumors/steelrumors/
          cp /tmp/sr-goodies-master/templates/base.html ~/proj/steelrumors/steelrumors/templates/
      

    Custom Login page

    1. Add to steelrumors/urls.py:

          url(r'^login/$', 'django.contrib.auth.views.login', {
              'template_name': 'login.html'}, name="login"),
          url(r'^logout/$', 'django.contrib.auth.views.logout_then_login',
              name="logout"),
      
    2. Add the login/logout URL locations to steelrumors/settings.py:

          from django.core.urlresolvers import reverse_lazy
      
          LOGIN_URL=reverse_lazy('login')
          LOGIN_REDIRECT_URL = reverse_lazy('home')
          LOGOUT_URL=reverse_lazy('logout')
      
    3. Now copy login.html from the goodies pack to the templates directory:

          cp /tmp/sr-goodies-master/templates/login.html ~/proj/steelrumors/steelrumors/templates/
      

      Refresh your browser to view the newly styled pages.

    Using django-registrations

    We will be using the “simple” backend of django-registrations since it is easy to use and understand.

    1. Currently, the version of django registration on the the Python Package Index doesn’t work well with Django 1.5. So we will use my forked version using pip:

          pip install git+git://github.com/arocks/django-registration-1.5.git
      

      Or if you don’t have git installed, use:

          pip install https://github.com/arocks/django-registration-1.5/tarball/master
      
    2. Edit settings.py to add registration app to the end of INSTALLED_APPS

          'registration',
          )
      
    3. Run syncdb to create the registration models:

          ./manage.py syncdb
      
    4. We need to use the registration form template from goodies pack. Since, this is for the registration app we need to create a registration directory under templates:

          mkdir ~/proj/steelrumors/steelrumors/templates/registration/
          cp /tmp/sr-goodies-master/templates/registration/registration_form.html
             ~/proj/steelrumors/steelrumors/templates/registration/
      
    5. Add to urls.py:

          url(r'^accounts/', include('registration.backends.simple.urls')),
      

      Visit http://127.0.0.1:8000/accounts/register/ and create a new user. This will throw a “Page not found” error after a user is created.

    Create a user’s profile page

    1. Add UserProfile class and its signals to models.py:

          class UserProfile(models.Model):
              user = models.OneToOneField(User, unique=True)
              bio = models.TextField(null=True)
      
              def __unicode__(self):
                  return "%s's profile" % self.user
      
          def create_profile(sender, instance, created, **kwargs):
              if created:
                  profile, created = UserProfile.objects.get_or_create(user=instance)
      
          # Signal while saving user
          from django.db.models.signals import post_save
          post_save.connect(create_profile, sender=User)
      
    2. Run syncdb again to create the user profile model:

          ./manage.py syncdb
      
    3. Add these to admin.py of links app to replace/extend the default admin for User:

      
          from django.contrib.auth.admin import UserAdmin
          from django.contrib.auth import get_user_model
          ...
          class UserProfileInline(admin.StackedInline):
              model = UserProfile
              can_delete = False
      
          class UserProfileAdmin(UserAdmin):
              inlines=(UserProfileInline, )
      
          admin.site.unregister(get_user_model())
          admin.site.register(get_user_model(), UserProfileAdmin)


      Visit http://127.0.0.1:8000/admin/ and open any user’s details. The bio field should appear in the bottom.

    4. Add to views.py of links apps:

          from django.views.generic import ListView, DetailView
          from django.contrib.auth import get_user_model
          from .models import UserProfile
          ....
          class UserProfileDetailView(DetailView):
              model = get_user_model()
              slug_field = "username"
              template_name = "user_detail.html"
      
              def get_object(self, queryset=None):
                  user = super(UserProfileDetailView, self).get_object(queryset)
                  UserProfile.objects.get_or_create(user=user)
                  return user
      
    5. Copy user_detail.html from goodies to steelrumors/templates/:

          cp /tmp/sr-goodies-master/templates/user_detail.html \
             ~/proj/steelrumors/steelrumors/templates/
      
    6. Let’s add the urls which failed last time when we tried to create a user. Add to urls.py:

          from links.views import UserProfileDetailView
          ...
          url(r'^users/(?P<slug>\w+)/$', UserProfileDetailView.as_view(), name="profile"),
      

      Now try to create a user and it should work. You should also see the profile page for the newly created user, as well as other users.

    7. You probably don’t want to enter these links by hand each time. So let’s edit base.html by adding the lines with a plus sign ‘+’ (omitting the plus sign) below:

            {% if user.is_authenticated %}
              <a href="{% url 'logout' %}">Logout</a> |
            +  <a href="{% url 'profile' slug=user.username %}"><b>{{ user.username }}</b></a> 
            {% else %}
            +  <a href="{% url 'registration_register' %}">Register</a> | 
      

      Refresh the browser to see the changes.

    Edit your profile details

    1. Add UserProfileEditView class to views.py in links app:

          from django.views.generic.edit import UpdateView
          from .models import UserProfile
          from .forms import UserProfileForm
          from django.core.urlresolvers import reverse
      
          class UserProfileEditView(UpdateView):
              model = UserProfile
              form_class = UserProfileForm
              template_name = "edit_profile.html"
      
              def get_object(self, queryset=None):
                  return UserProfile.objects.get_or_create(user=self.request.user)[0]
      
              def get_success_url(self):
                  return reverse("profile", kwargs={'slug': self.request.user})
      
    2. Create links/forms.py:

          from django import forms
          from .models import UserProfile
      
          class UserProfileForm(forms.ModelForm):
              class Meta:
                  model = UserProfile
                  exclude = ("user")
      
    3. Add the profile edit view to urls.py. Protect it with an auth decorator to prevent unlogged users from seeing this view.

          from django.contrib.auth.decorators import login_required as auth
          from links.views import UserProfileEditView
          ...
          url(r'^edit_profile/$', auth(UserProfileEditView.as_view()), name="edit_profile"),
      
    4. Copy edit_profile.html from goodies to steelrumors/templates/:

          cp /tmp/sr-goodies-master/templates/edit_profile.html \
             ~/proj/steelrumors/steelrumors
      
    5. Add the following lines to templates/user_detail before the final endblock:

          {% if object.username == user.username %}
          <p><a href='{% url "edit_profile" %}'>Edit my profile</a></p>
          {% endif %}
      

      Now, visit your profile page and try to edit it.

    Easter Egg Fun

    Add the following lines to user_detail.html before the endblock line:

    {% if "zodcat" in object.userprofile.bio %}
    <style>
    html {
      background: #EEE url("/static/img/zod.jpg");
    }
    </style>
    {% endif %}
    

    Now mention “zodcat” to your bio. You have your easter egg!

    Final Comments

    We have a much better looking site at the end of this tutorial. While anyone could register to the site, they will not be part of the staff. Hence, you cannot submit links through the admin interface. This will be addressed in the next part.

    That concludes Part 2. Follow me on Twitter at @arocks to get updates about upcoming parts.

    EDIT: Check out Part 3!

    Resources

    Comments →

    Building a Hacker News clone in Django - Part 1

    You are reading a post from a four-part tutorial series

    There is no better way to learn something than to watch someone else do it1. So, if you have been waiting to go beyond the basics in Django, you have come to the right place.

    In this video tutorial series, I would take you through building a social news site called “Steel Rumors” from scratch in Django 1.5. In case you don’t like videos and prefer to read the steps, you can find them here too.

    Even though we will start from the basics, if you are an absolute beginner to Django, I would suggest reading the tutorial or my previous screencast on building a blog in 30 mins

    The completed site would support user signups, link submissions, comments, voting and a cool ranking algorithm. My approach would be to use as many builtin Django features as possible and use external apps only when absolutely necessary.

    Check out a demo of Steel Rumors yourself.

    Click on the image below to watch the screencast or scroll down to read the steps.

    Screencast

    If you liked this tutorial, then you should sign up for my upcoming book “Building a Social News Site in Django”. It tries to explain in a learn-from-a-friend style how websites are built and gradually tackles advanced topics like database migrations and debugging.

    Step-by-step Instructions

    Here is the text version of the video for people who prefer to read. We are going to create a social news site similar to Hacker News or Reddit. It will be called “Steel Rumors” and would be a place to share and vote some interesting rumors about “Man of Steel”.

    The outline of Part 1 of the screencast is:

    • Objective
    • VirtualEnv - Start from Scratch!
    • Model Managers - Dream Job #78
    • Basic Template
    • Generic Views - ListView and DetailView
    • Pagination - For free!

    Setup Virtual Environment

    1. We will create a virtual development environment using virtualenv and virtualenvwrapper. Make sure you have installed them first:

          mkvirtualenv djangorocks
      

      I use an Ubuntu variant called Xubuntu in my screencast. But you should be able to replicate these steps in other OSes with minimal changes.

    2. Install Django (make sure you already have pip installed)

          pip install Django==1.5
      

      You can also use Django 1.5.1. The latest Django version may or may not work with our code, hence it is better to specify a version to follow this tutorial.

    Create Project and Apps

    1. Create a project called steelrumors:

          cd ~/proj
          django-admin.py startproject steelrumors
          cd steelrumors
          chmod +x manage.py
      
    2. Open steelrumors/settings.py in your favourite editor. Locate and change the following lines (changes in bold):

      1. 'ENGINE': 'django.db.backends.__sqlite3__'
      2. 'NAME': '__database.db__',
      3. At the end of INSTALLED_APPS = (     __'django.contrib.admin',__
      
    3. Next, change steelrumors/urls.py by uncommenting the following lines:

          from django.conf.urls import patterns, include, url
          from django.contrib import admin
          admin.autodiscover()
      
          urlpatterns = patterns('',
              url(r'^admin/', include(admin.site.urls)),
          )
      
    4. Sync to create admin objects and enter the admin details:

          ./manage.py syncdb
      
    5. Open a new tab or a new terminal and keep a server instance running (don’t forget to issue workon djangorocks in this terminal):

          ./manage.py runserver
      
    6. Visit the admin page (typically at http://127.0.0.1:8000/admin/) and login.

    7. Create links app:

          ./manage.py startapp links
      
    8. Enter the following two model classes into links/models.py:

          from django.db import models
          from django.contrib.auth.models import User
      
          class Link(models.Model):
              title = models.CharField("Headline", max_length=100)
              submitter = models.ForeignKey(User)
              submitted_on = models.DateTimeField(auto_now_add=True)
              rank_score = models.FloatField(default=0.0)
              url = models.URLField("URL", max_length=250, blank=True)
              description = models.TextField(blank=True)
      
              def __unicode__(self):
                  return self.title
      
          class Vote(models.Model):
              voter = models.ForeignKey(User)
              link = models.ForeignKey(Link)
      
              def __unicode__(self):
                  return "%s upvoted %s" % (self.voter.username, self.link.title)
      
    9. Create the corresponding admin classes. Enter the following into links/admin.py:

          from django.contrib import admin
          from .models import Link, Vote
      
          class LinkAdmin(admin.ModelAdmin): pass
          admin.site.register(Link, LinkAdmin)
      
          class VoteAdmin(admin.ModelAdmin): pass
          admin.site.register(Vote, VoteAdmin)
      
    10. Enter the following into links/views.py:

          from django.views.generic import ListView
          from .models import Link, Vote
      
          class LinkListView(ListView):
              model = Link
      
    11. Insert following lines into steelrumor/urls.py:

          from links.views import LinkListView
          ...
          urlpatterns = patterns('',
              url(r'^$', LinkListView.as_view(), name='home'),
      
    12. Create a new templates directory and enter the following at steelrumors/templates/links/link_list.html:

          <ol>
          {% for link in object_list %}
              <li>
              <a href="{{ link.url }}">
                <b>{{ link.title }}</b>
              </a>
              </li>
          {% endfor %}
          </ol>
      
    13. Edit settings.py to add our two apps to the end of INSTALLED_APPS = (

          'links',
          'steelrumors',
          )
      
    14. Sync to create link objects:

          ./manage.py syncdb
      
      Visit http://127.0.0.1:8000/admin/ and add a couple of Link objects. Now if you open http://127.0.0.1:8000/ you should see the added Links
      

    Add Branding

    1. Create a common base template at steelrumors/templates/base.html:

          <html>
          <body>
          <h1>Steel Rumors</h1>
      
          {% block content %}
          {% endblock %}
      
          </body>
          </html>
      
    2. Modify steelrumors/templates/links/link_list.html and surround previous code with this:

          {% extends "base.html" %}
      
          {% block content %}
          ...
          {% endblock %}
      

    VoteCount Model Manager

    1. We need a count of votes within our generic ListView. Add these to links/models.py:

          from django.db.models import Count
      
          class LinkVoteCountManager(models.Manager):
              def get_query_set(self):
                  return super(LinkVoteCountManager, self).get_query_set().annotate(
                      votes=Count('vote')).order_by('-votes')
      
    2. Insert these two lines into the Link class in links/models.py:

          class Link(models.Model):
          ...
      
              with_votes = LinkVoteCountManager()
              objects = models.Manager() #default manager
      
    3. Edit links/views.py and insert these two lines into the LinkListView class:

          class LinkListView(ListView):
          ...
      
              queryset = Link.with_votes.all()
              paginate_by = 3
      

    Crazy Fun

    You can add 100 votes to random headlines using the following lines in the django shell:

    $ ./manage.py shell
    >>> from links.models import Link, Vote
    >>> from django.contrib.auth.models import User
    >>> a = User.objects.all()[0]
    >>> for i in xrange(100): Vote(link=Link.objects.order_by('?')[0],voter=a).save()
    

    Now visit http://127.0.0.1:8000/admin/ to find lots of Votes objects.

    Final Comments

    In case, you are wondering if this version of the site would be useful, I would say that it works well for a private beta version. Any new user would have to be added by the admin interface manually. They must be of the staff kind if they have to login via the admin interface. Staff can vote by manually creating Vote objects.

    The public facing part of the site can still show the top rumors based the votes received by the staff. Based on how well designed the templates are, this version could be also used to get feedback about the site’s design and branding.

    That concludes Part 1. Follow me on Twitter at @arocks to get updates about the following parts.

    EDIT: Check out Part 2!

    Resources


    1. This became very controversial. Most people learn best by doing it themselves. But they need to read/hear/see it first from someone. I am actually a self-taught programmer. I learnt most of programming from books and trying it myself. Learning by doing is certainly the best way to learn. But among source of learning, watching an expert is probably the best. ↩︎

    Comments →

    Easy and Practical Web scraping in Python

    This post is inspired by an excellent post called Web Scraping 101 with Python. It is a great intro to web scraping to Python, but I noticed two problems with it:

    1. It was slightly cumbersome to select elements
    2. It could be done easier

    If you ask me, I would write such scraping scripts using an interactive interpreter like IPython and by using the simpler CSS selector syntax.

    Let’s see how to create such throwaway scripts. For serious web scraping, Scrapy is a more complete solution when you need to perform repeated scraping or something more complex.

    The Problem

    We are going to solve the same problem mentioned in the first link. We are interested in knowing the winners of Chicago Reader’s Best of 2011. Unfortunately the Chicago Reader page shows only the five sections. Each of these sections contain award categories e.g. ‘Best vintage store’ in ‘Goods & Services’. Within each of these award category pages you will find the winner and runner up. Our mission is to collect the names of winners and runner ups for every award and present them as one simple list.

    The Setup

    Start python, IPython, bpython or any other interactive python interpreter of your choice. I shall be using IPython for the rest of this article.

    A common starting point for most web parsing needs is getting a parsed web page from a URL. So let’s define our get_page function as follows:

    from urllib2 import urlopen
    from lxml.html import fromstring
    
    def get_page(url):
        html = urlopen(url).read()
        dom = fromstring(html)
        dom.make_links_absolute(url)
        return dom
    

    Within the get_page function, the first line downloads the page using urlopen function and returns it’s contents in the form of a string. The second line uses lxml to parse the string and returns the object representation of the page.

    Since, most links in the html page will be relative pages we will convert them to absolute links. For e.g. a link like /about will be converted into http://www.chicagoreader.com/about. This makes it easy to call get_page function on such URLs later.

    Selecting Page Elements

    Next we need to invoke this function and select parts of the document. But before that we need to know which parts we need.

    I prefer using CSS selector syntax compared to XPaths for selecting nodes. For examplem, the path to the same element in these two different syntax are shown below:

    • CSS Path: html body#BestOf.BestOfGuide div#gridClamp div#gridMain div#gridFrame div#gridMainColumn div#StoryLayout.MainColumn div#storyBody.page1 strong p a

    • XPath: /html/body/div[3]/div[2]/div/div[2]/div[5]/div/strong/p[2]/a

    CSS paths might be longer but are easier to understand. More importantly, they are easier to construct.

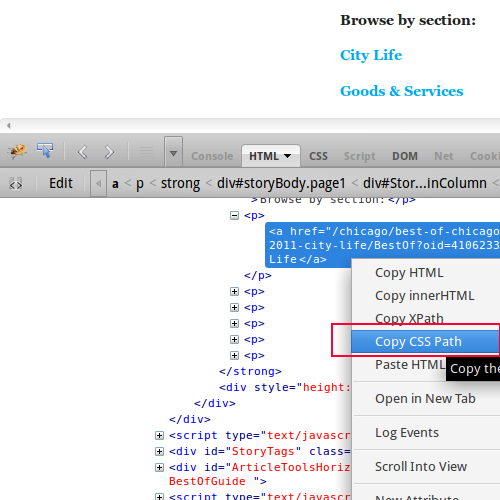
    On Firefox, you can use Firebug to right click on any page element to get it’s CSS path.

    Finding CSS paths in Firefox using Firebug

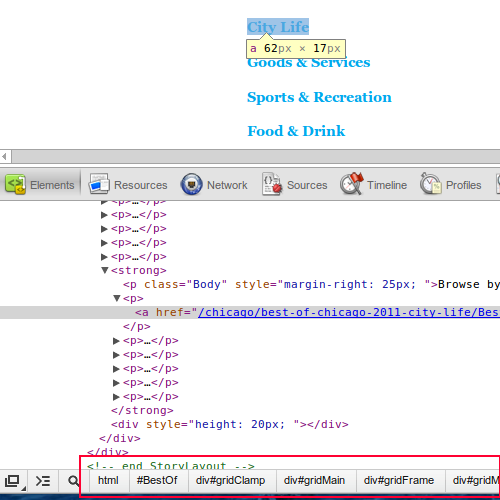
    On Chrome, you will not be able to copy the CSS path but you can see it displayed on the status bar at the bottom

    Finding CSS paths in Chrome

    Selector Gadget

    These CSS paths are extremely long and I wouldn’t recommend using them. They are too specific and tied to the overall document structure, which might change. Moreover, you can shorten a CSS selector path without affecting it’s specificity.

    I recommend using a bookmarklet called Selector Gadget which elegantly solves both these problems. It also works across browsers.

    First drag the bookmarklet to your bookmark toolbar. Open any page and click on the Selector Gadget to activate it. Now click on the element for which you want the CSS selector. Once you click an element, it will turn yellow and the CSS selector will appear in the gadget. Many other elements matching that selector will be also shown in yellow.

    Sometimes, elements which you do not require are also matched. To eliminate that, click on an element you DO NOT want to match. Continue this process of selection and rejection till you get the exact CSS selector you want. Click on the ‘Help’ button for instructions.

    Using iPython

    Start your iPython interpreter and paste the lines of code, we saw previously:

    $ ipython
    Python 2.7.3 (default, Sep 26 2012, 21:51:14) 
    Type "copyright", "credits" or "license" for more information.
    
    IPython 0.13.1.rc2 -- An enhanced Interactive Python.
    ?         -> Introduction and overview of IPython's features.
    %quickref -> Quick reference.
    help      -> Python's own help system.
    object?   -> Details about 'object', use 'object??' for extra details.
    
    In [1]: from urllib2 import urlopen
    
    In [2]: from lxml.html import fromstring
    
    In [3]: def get_page(url):
       ...:         html = urlopen(url).read()
       ...:         dom = fromstring(html)
       ...:         dom.make_links_absolute(url)
       ...:         return dom
       ...: 
    
    In [4]: dom = get_page("http://www.chicagoreader.com/chicago/best-of-chicago-2011/BestOf?oid=4100483")


    In the last line, you retrieve the initial page you would like to be scraped and assign its parsed DOM object into dom.

    In the next three commands, cssselect function is invoked with the CSS selector “#storyBody p a” to get all the section links. The result is a list. Since we need just the URLs, we run a list comprehension across the list of links.

    In [5]: dom.cssselect("#storyBody p a")
    Out[5]: 
    [<Element a at 0x336ae90>,
     <Element a at 0x336afb0>,
     <Element a at 0x336c2f0>,
     <Element a at 0x336c3b0>,
     <Element a at 0x336c170>,
     <Element a at 0x336c350>]
    
    In [6]: [link.attrib['href'] for link in _]
    Out[6]: 
    ['http://www.chicagoreader.com/chicago/best-of-chicago-2011-city-life/BestOf?oid=4106233',
     'http://www.chicagoreader.com/chicago/best-of-chicago-2011-goods-and-services/BestOf?oid=4106022',
     'http://www.chicagoreader.com/chicago/best-of-chicago-2011-sports-recreation/BestOf?oid=4106226',
     'http://www.chicagoreader.com/chicago/best-of-chicago-2011-food-drink/BestOf?oid=4106228',
     'http://www.chicagoreader.com/chicago/best-of-chicago-2011-arts-culture/BestOf?oid=4106230',
     'http://www.chicagoreader.com/chicago/best-of-chicago-2011-music-nightlife/BestOf?oid=4106223']
    
    In [7]: secns = _
    

    Note that we are using the underscore ‘_’ symbol to refer to the result of the previous command. With this tip, we can avoid inventing names for temporary results. Also whenever we get a result worth keeping, we can name them in hindsight.

    Finding all categories

    Next we need to retrieve and parse each section page. It can be easily done with the following list comprehension. The second command is a nested list comprehension with two loops. As before, we just need the urls. All 389 of them, each representing an award category.

    In [13]: doms = [get_page(secn) for secn in secns]
    
    In [14]: [link.attrib['href'] for dom in doms for link in dom.cssselect("#storyBody a")]
    Out[14]: 
    
    In [15]: categs=_
    
    In [16]: len(categs)
    Out[16]: 389


    Finding the title, winner and runner-up

    Next, open any url from the categs list and find CSS selectors for our items of interest. These three items are: award category title, winner and runner-up. Since cssselect function returns a list (even if only one match is found) we need to extract the 0-th element. Another function called text_content is applied to get just the information we are looking for.

    In [17]: categ = categs[0]
    
    In [18]: dom=get_page(categ)
    
    In [19]: dom.cssselect("h1.headline")[0].text_content()
    Out[19]: u'Best longtime cause worth fighting for\xa0'
    
    In [20]: dom.cssselect(".boc1")[0].text_content()
    Out[20]: 'Public school reform'
    
    In [21]: dom.cssselect(".boc2")[0].text_content()
    Out[21]: 'Recycling in Chicago'


    Named Tuples - Ideal data structures for scraped input

    Earlier, tuples were used for storing scrapped results. They use less memory compared to dictionaries. Recently, Python has support for named tuples which are much clearer to use and just as memory efficient.

    The next few commands loops through all the award categories and adds a named tuple for each. To avoid fetching too many pages, I have truncated the list to only the first two items.

    
    In [22]: from collections import namedtuple
    
    In [23]: Award = namedtuple("Award", "title, winner, runnerup")
    
    In [24]: awards = []
    
    In [25]: for categ in categs[:2]:
                 dom=get_page(categ)
                 title = dom.cssselect("h1.headline")[0].text_content()
                 winner = dom.cssselect(".boc1")[0].text_content()
                 runnerup = dom.cssselect(".boc2")[0].text_content()
                 a = Award(title=title, winner=winner, runnerup=runnerup)
                 awards.append(a)
    
    In [36]: awards
    Out[36]: 
    [Award(title=u'Best longtime cause worth fighting for\xa0', winner='Public school reform', runnerup='Recycling in Chicago'),
     Award(title=u'Best historic building\xa0', winner='Chicago Cultural Center', runnerup='The Rookery')]


    Power of Interactivity

    For one-time scraping scripts, it is often best to use just the Python interpreter. I have tried to walk you through how I would attack the problem of scraping a set of web pages. Hope you found it useful!

    Comments →

    Moving Blogs to Pelican

    Redesigning a site takes a lot of planning. I usually take it as an opportunity to study what is the state of the art and implement many long standing items from my wish list. So this post will be a lot more than explaining why I moved to Pelican from Jekyll.

    Background

    I had stopped using Wordpress about two years back. I was a long time user of Wordpress and had even written some plugins. But I was afraid that whatever I had written was turning into a binary blob in some database.

    Don’t believe me? Just open your Wordpress database tables in phpmyadmin or any other tool. If you use Microsoft Word, be prepared to get shocked seeing a lot of unnecessary tags like <SPAN>, class names like class=MsoNormal or converted punctuation marks like &lsquo;. Even web-based composers add a lot of horrible markup. I even tried using the plain text editor with Markdown markup. But something would still get mangled somehow.

    Another major annoyance was that Wordpress had a huge attack surface. Everytime someone finds out a Wordpress exploit, your site is at risk. Only way to secure your content was to take frequent backups and keep updating the software. The latter was often painful as plugins tend to break in an upgrade. On top of all that, a little voice in the back of my head kept telling “Why do you a dynamically generated site for a blog when there is nothing inherently changing most of the time?”

    Jekyll

    Jekyll (and thousands of other static blog generators that followed) offered a simpler solution. Each blog post is stored as a file. Each time you make a change or add a new post, the entire site is “baked” and then uploaded. No need for your server to sweat about dynamically constructing your page for every hit. It is already composed. Just serve it. Simple and extremely efficient.

    There were also some nice side effects. Text files could be version controlled. So there is always an option to go back in time and revert back to an older version of the site. Text files could also be easily searched manually or with simple UNIX tools. If you use Markdown or RST, your posts will be extremely readable without any silly markup.

    The generated site was also much easier to understand. The site will no longer be littered with hundreds of files under scary directories like wp-admin or wp-include. I mean each of these are potential doorways for malicious exploits waiting to be discovered in the future. Jekyll sites are just made of plain old HTML, CSS or JavaScript. In other words, it is 100% content without any risky overheads.

    Here is the best part - you can host your site anywhere! Think of the most basic hosting provider without PHP support (rare but possible), they should be able to serve HTML. Jekyll site can be browsed locally through its built-in server. Even with regular hosting, if ever your post gets too popular and gets reddited/slashdotted/DOS-ed, you can always just copy the site to a more available server and redirect gracefully.

    So, what might sound like a luddite blogging tool is actually a much improved and fault tolerant system. Of course, it is not for the faint-hearted. I migrated arunrocks.com to Jekyll in 2011.

    So What was Wrong with Jekyll?

    In short - Nothing. I was pretty much in love with the simplicity of it all. Until, like the cliche for ending relationships goes - I found out it was not Jekyll, it was me who had issues.

    Slow Rebuilds

    Of course, it is not without flaws. Jekyll takes an inordinate amount of time to ‘bake’ a site. Since it doesn’t support incremental builds, for every small edit to a post the entire site needs to be rebuilt. This is quite slow for even moderately big sites, often taking several minutes. Anecdotally speaking, when I tried python based tools, they seemed to be faster. But it could also be the effect of moving to my new SSD.

    Compiling

    I realise that incrementally building or partial regeneration might be too hard or even impossible. After all, you will need to keep track of dependencies between your posts and parts of a page like sidebars. So we might be stuck with a full rebuild for a while and any speed improvements here would really enhance the blogging experience.

    Ruby vs Python

    Another pet peeve I had was that Jekyll was Ruby based. Even though Python was always my language of choice, I had intentionally picked Jekyll hoping to brush up my Ruby skills. I wrote Jekyll extensions. But I kept itching for Python.

    I also tried to look for a single programming language platform for my blogging needs. As you might be aware Jekyll has several dependencies some of which are not Ruby-based like Pygments for syntax highlighting.

    I tried to bucket all my preferred dependencies into the programming language they were built on and realised that installing both Ruby and Python would be inevitable:

    1. Uses Python - Pygments, Jinja
    2. Uses Ruby - Compass/Sass
    3. Either - Markdown

    Of course, implementations have been ported between languages. But I prefer to use the original even if I need to maintain two platforms. I would rather work with a good implementation than a half-baked port.

    Lack of maintenance

    This has been addressed recently by the revival of Jekyll development by Parker. But Jekyll was neglected for a long time by the maintainers. Bugs and feature requests kept piling up. Of course, it is always a good idea to keep a blogging tool simple (looking at you, Wordpress). But issues like the site generation time were getting hard to ignore.

    More options

    This is not an issue with Jekyll as much as an acknowledgement of the competition. When Jekyll was introduced, it was new and cool in an almost retro sense. But then suddenly, everyone picked it up and it became obvious that it will be the new trend in blogging (and clearly, not retro anymore). This led to several hackers creating a static blog generator in a weekend.

    In fact, it is not quite hard to implement 80% of what Jekyll does. But, as the saying goes, it is the remaining 20% that takes more than 80% of the effort. This led to a mind boggling number of choices for the geeky blogger - Nanoc, Hyde, Pelican, Poole, webby, hackyll and the list grows every weekend!

    The good news is that now there are many options in my preferred language - Python. The bad news is that now there are so many options. So why did I finally choose Pelican? Before I tell you that let me engage/bore you with my new web design directions.

    Forget Responsive Design, It is Mobile-first

    When I started redesigning arunrocks in 2011, Responsive Design was a hot new trend in web design. People using mobile devices and tablets wanted a full-width experience without needing to use a separate mobile optimised version of the site. Responsive design (a poorly named term, according to me) promised to adapt the website’s layout to the user’s browser using CSS media queries.

    It was fun to play with your site’s design and watch it magically transform on a mobile or tablet. But it was not entirely flawless. Early implementations of Responsive design implied that you would design for the big screen (desktops) and then adapt it to smaller screens. This was extremely wasteful. Big images and backgrounds meant for desktop users started flowing to the mobile users and, funnily enough, hidden from them too.

    A better approach would have been to only load the minimum required resources first, especially for the mobile devices. The former is called Graceful Degradation and the latter is called Progressive Enhancement or in common language, Mobile First.

    Mobile users are becoming more and more significant for a blogger. IDC predicts that by 2015, more people will access the Internet through a smartphone or tablet than a PC. Long form reading might not be easy or comfortable on a laptop or desktop screen. People would increasingly prefer to carry such reading material wherever they go, just like a book.

    Of course, intuitively it is much more obvious since most people don’t carry their desktops to their bathrooms.

    Readability

    I am a big fan of Readability. If Web Design is 95% typography, then I would argue that Blogs are all about readability. If you have to design a good blog, then you must emphasise the reading comfort for the reader over any other design flourishes.

    Readability can be significantly improved by making some objective improvements:

    1. Fonts - Select fonts optimised for on-screen reading
    2. Optimal Line Length - 50-60 characters per line
    3. High contrast - Text colour must contrast well against the background
    4. Negative space - Breathing space between lines, from the window edges

    Of course, there is a lot more if you ask the experts - Vertical Rhythm, Leading, Hyphenation etc. But these are the basics, that I would expect every blog including mine to stick to.

    Speed is Everything

    My overriding priority with the redesign was to design for Speed particularly page loading speed. If a gradient could be done in CSS rather than images then do it. If an icon can be replaced by text, then do it. In other words, make it look simple and minimal. But that was just a side effect of making the page load faster.

    Why is this so important? I hate sites that make you wait for its various pieces to load and come alive. It is 2013 and we still have sites that take several seconds to open especially on low bandwidth connections. Speed is crucial to the user experience. To me, speed is beautiful. I admire a snappy site.

    Some of the key optimisations done to improve the speed of arunrocks:

    1. Maximum use of CSS3 - Even if some browsers don’t support it
    2. Replace Icons with Text - For navigation and other key interfaces
    3. Lesser Images - Avoid fancy backgrounds and logos, if possible
    4. Lesser Asides - Avoid extra sidebars, huge footers and other clutter
    5. Reduce Files - Avoid multiple CSS/JS. Remove JQuery and other redundant stuff
    6. Reduce File sizes - Minify and gzip almost everything

    The book Hardboiled Web Design really influenced me while arriving at the first point. It encouraged me to leverage all the new CSS features even if all browsers may not support it yet. Style down rather than style up!

    One of the fun things I do when I design a site is to obsess over the icon designs. Even though it is fun, it is usually pointless. Half of the users don’t understand what every icon means and studies have shown that it is usually the text what makes the meaning clear. So, text-only is usually better. Plus, Google Translate can help non-English visitors too.

    In short, I aggressively cut-down anything that was non-essential to most visitors. I had some Jquery based functionality for keyboard navigation, social sharing, analytics etc. They were removed along with JQuery. Even CSS frameworks for mobile first patterns were dumped. Simple CSS rules were used instead. Sass helps in combining multiple CSS files and minifying them. Wherever a byte could be saved, it was saved.

    Other Design Thoughts

    This is my first site where I have made extensive use of Compass/Sass. It is a real time-saver compared to working directly on CSS. It helps you give a uniform look to the site. For instance by assigning link color to one variable, you can use color functions to assign that color’s shades to other elements. It can reduce typing while adding Vendor-specific properties in CSS.

    The responsive design is now based on the needs of the design, rather than on known device sizes. Almost nothing had to be “hidden” in smaller screens, thanks to the Mobile First approach.

    Upon completing the design, there was an overwhelming feeling of “this is a site I want to read”. Building something for one self is often the best approach to build something creatively. Not to mention that the satisfaction is immense too.

    Blogging with Pelican

    While choosing a blogging engine built using Python, Pelican seemed to be the most mature and actively developed project. Pelican is currently at version 3.1.1 and seems to have incorporated a lot of good ideas. Rather than list down all its features, I will mention some of the features that appealed to me:

    1. Ability to add extensions - Pretty obvious advantage
    2. Blog-aware - Supports tags, feeds and pagination
    3. Based on Jinja - familiar syntax to Django developers
    4. Supports Markdown extensions - Created a pullquote extension for myself
    5. Asset management with webassets - Supports Less, Sass, Coffeescript etc

    Migrating posts from Jekyll to Pelican was not quite easy since they use different post structure (YAML versus meta tags) and directory layouts. Unlike Jekyll, if you have a file say favicon.ico in the top level directory, Pelican will not automatically copy it to the destination.

    In Pelican, you need to mention such files in the configuration file explicitly. I did not like this initially, but later realised that it might be good from a security perspective.

    The url structure is also more rigid in Pelican. All static content like CSS and images go to the /static/ folder. The pages (non-blog posts) go to a /pages/ folder (by default). I had to add specific rewrite rules using an .htaccess file to paper over such differences.

    I also simplified the blog URL structure. It was a carryover from my Wordpress days. A typical blog title used to be:

    http://arunrocks.com/blog/2012/12/05/a_long_title_here/

    Now it is just:

    http://arunrocks.com/a_long_title_here/

    Shorter URLs are better for Twitter users and SEO. It is also easier to pronounce!

    Markdown extensions

    Python’s implementation of Markdown has a great Extensions API with several great extensions. For example, Header ID automatically creates a short id for each heading in the article, acting as anchor targets. This means that you can deep link to a content within a post. I wish Google could do this automatically when I am looking for a search string within a page.

    I also wrote a pull quote extension which takes a phrase from the article and displays it in a bigger font beside the article. This usually helps while scanning long articles. A technique borrowed from magazine articles. (UPDATE: it has been open sourced! )

    It is a Wrap

    The wish list always keeps growing. There will be always something cool happening in the blogging or web design world. You cannot always keep up. But so far, Pelican gives a fast and easy to manage setup for my blogging needs. I would definitely recommend that you try it out too.

    Comments →

    « Newer Page 8 of 39 Older »